| description | cover | coverY | layout | ||||||||||||||||||||||||||
|---|---|---|---|---|---|---|---|---|---|---|---|---|---|---|---|---|---|---|---|---|---|---|---|---|---|---|---|---|---|
06/03/2024 |
41.88666666666666 |
|
So you want to dive into the fragmented, quirky, yet awesome world of Android?
{% hint style="info" %} I highly recommend you check out Dark Wolf Solutions Android Security Research Playbook (ASRP) for aid in creating an awesome Android Security Research environment that you can work in and efficiently find bugs with the least amount of headache!
Go back and check out ..! {% endhint %}
Now, that's out of the way and you have your Android Security Research environment up and running, let's dive in!
Well, you've come to the right place.
I already explained in earlier posts that you should follow DWS's ASRP for setting up your environment and using it as a blueprint to guide you through your Android efforts.
Here, we will be getting into the more niche setups that are required to pinpoint vulnerabilities.

PoV: You after reading this series 😏
The AndroidManifest.xml file.
This should be the first file you analyze immediately after decompiling/disassembling the original APK.
This file is responsible for declaring everything that the application is capable of and allowed to do.
It is mandatory that this file is to exist and be created in order for an APK to compile and work. Without it, an APK will not compile properly.
ACCESS_FINE_LOCATIONS-> GPS Telemetry DataREAD_CONTACTS-> Permission to read contactsWRITE_EXTERNAL_STORAGE-> Permission to write to the SD card on the phoneRECORD_AUDIO-> Common in spyware, records audio without user knowledge
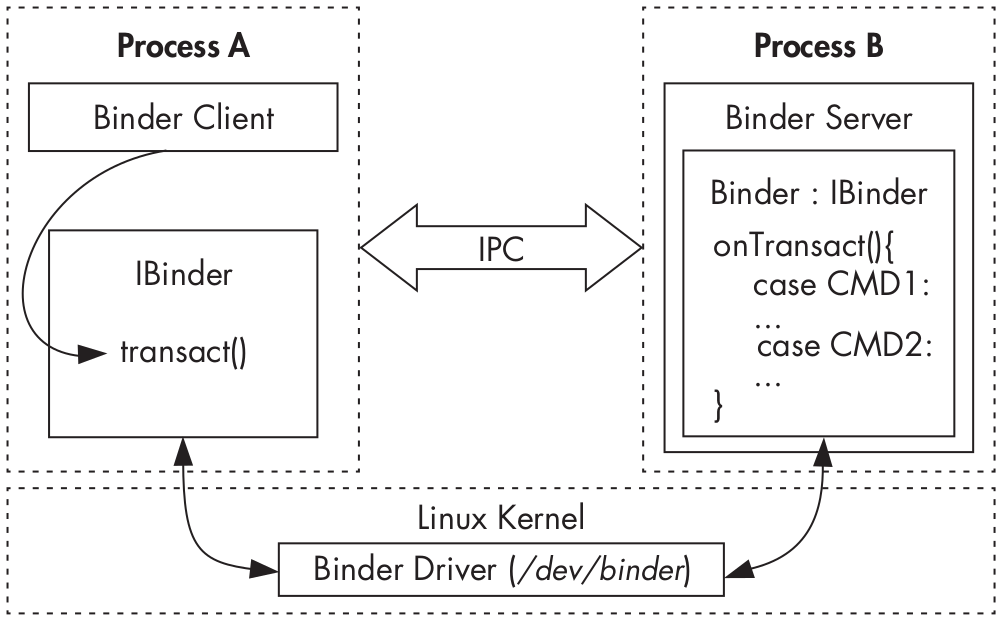
{% embed url="https://source.android.com/docs/core/architecture/hidl/binder-ipc" %}
{% embed url="https://null-android-pentesting.netlify.app/src/image/v2/2-binder.png" fullWidth="false" %} Binder IPC Depiction {% endembed %}
This is an Android mechanism that allows different processes to communicate with one another.
IPC calls are utilized to access/communicate with other services (e.g. camera or some online service).
Binder IPC is based on OpenBinder.
- Binder kernel driver
- This can be found in
/dev/binder, located directly on the Android device
- Context Manager
- Binder Service
- Binder Client
- Binder Token
The binder framework is responsible for handling transaction parcels so that developers are not required to work this close to low-level, underlying technologies.
These communications do not occur directly; rather, process communicate via Binder Drivers that utilize a Binder protocol (low-level I/O Control-based protocol).
The kernel driver is responsible for creating shared memory.
This is a memory that is only read-accessible for apps. In other words, apps that want access to the service.
The kernel is capable of writing to memory in order to do things that allows you to write results back to shared memory for you.
This is possible via secure communications from Binder Tokens.
In some cases, this is worth looking at, as it could allow us as researchers to be able to leverage things that our target application is not supposed to do or have access to. Here, RCE would be a critical cyber effect, allowing us access to the application's underlying sandbox. From here, we can gain access and even leverage services or find vulnerable ones.
This is why looking at native components is so important as a simple buffer overflow can lead to an entire hijacking of the flow of execution; allowing us to take control of the entire device. This of course, depends on the cyber effect, meaning Remote Code Exectution (RCE) or privilege escalation capabilities.
{% embed url="https://source.android.com/docs/security/features/selinux" %}
 (1).png)
This is a special addition and security implementation for Linux systems that utilize an advanced access control system, known as Mandatory Access Controls (MAC).
MAC is responsible for enhancing security through access controls. Meaning, resources can ONLY access what they need. On SELinux-activated systems, controls are enforced through security policy enforcement.
- Enforced Mode -> SELinux is activated
- Permissive Mode -> SELinux is not activated
We can utilize the Android Debug Bridge, or ADB in order to accomplish this:
adb pull /sys/fs/selinux/policy /tmp
We can then utilize seinfo policy -x to view the current implementation of the SELinux policy that is in effect on that device.
- What can you access?
- What restrictions are placed on the target process(s)?
We can view this on a pulled SELinux policy by performing:
seinfo policy -aapdomain -x
We can accomplish this by the following:
getenforce
🤔 Remember, enforcing = SELinux is enabled, permissive = logging is enabled and verbose, but SELinux is not enforced.
If you have root-level permissions on the device, we can simply do the following to disable SELinux:
su # Escalate permissions to root-level (super user)

setenforce 0 # Set the SELinux enforcement level to 0 (permissive/inactive)

getenforce # Verify successful disable of SELinux
However, in some cases, certain OS's and vendors disable setenforce usage. Meaning, we need to get creative.
To combat this, we can leverage debuggers (like GDB), to disable SELinux during exploitation by setting the selinux_enforcing global variable to null.
Since the pulled SELinux policy is a binary blob, we can load it into GDB!
gdb <pulled_selinux_policy_here>

p *selinux_enforcing # Obtain current value and address

p &selinux_enforcing # Obtain current value and address
<0xaddr_here>

x/x <0xaddr_here> # Examine the address contents in hex

set selinux_enforcing = 0x00 # Modify value to permissive (this is the same as setenforce 0)

# 1 = enforcing 2 = permissive

c
This is OWASP's Mobile Application Security Testing Guide!
Be sure to reference this throughout your adventures.
gdb-multiarch vmlinux

target remote <IP:Port>

# Utilize steps above to determine SELinux policy and modify global variable