Note that for Docker Desktop users, you need to have the File Sharing turned on to run OpenRMF the way it is designed in the docker-compose file. We use persistent volumes for MongoDB, Grafana, and Prometheus. Also for anyone running on a system with any firewall (Windows Firewall, firewalld, iptables) you will need to have ports 8080 and 9001 accessible from external if you are not doing everything locally on the same box. If you plan to access the web interface from another connected machine, please ensure your firewall settings allow these ports coming in first.
Tested with Docker Desktop 2.x onward with 6 CPUs, 6 GB RAM, 1 GB swap and 60 GB Disk Image. You will want more than the default 2 CPU and 2 GB RAM to maximize the use of OpenRMF specifically. Your machine age and hardware will make this vary some. If you see timeouts on Keycloak and OpenRMF when uploading, running reports, or web UI screens taking a long time to load you may want to check the Docker Desktop Resources of your machine.
To run OpenRMF you first need Keycloak running. I have a ZIP file under the latest release just for the Keycloak setup. Download that and unzip it into its own directory. Then run the start.sh or start.cmd file to run it. If you do not have Keycloak and Postgres (they work together for this) as containers, this script will also help download them. Then run them.
Once you have Keyloak setup, if you have a Linux or Mac you can automate the setup. A Windows setup script is coming. For Windows users, check the Keycloak manual steps file and then come back here. Everyone else, run that script locally and enter the IP of your machine (it looks locally for the Keycloak container) and then enter a starting user. The rest is done for you. The results should look like the below.

Now, you can launch the http://localhost:9001/auth URL in a browser.
-
Click on the "Administrator Console" block on the bottom left and you are presented with a login prompt.
-
Use the admin/admin login from the keycloak docker-compose file (or whatever you changed it to) to get into the Keycloak UI.
-
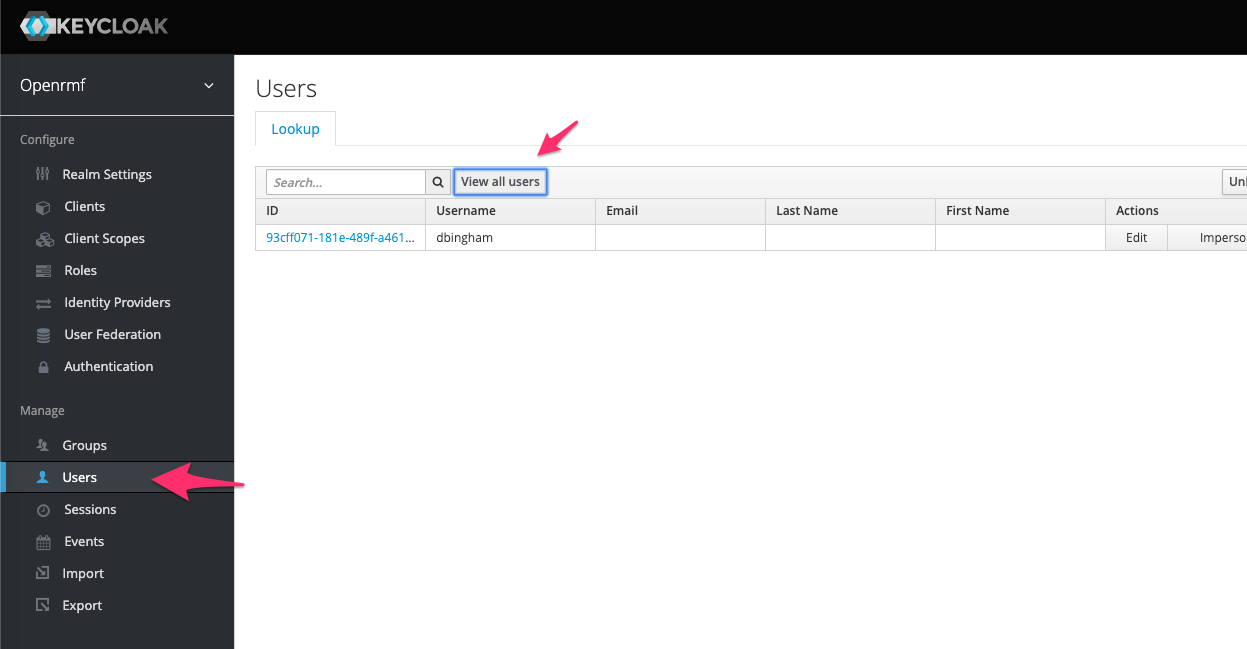
Click 'Users' under the Manage section on the left-side menu.
-
Click the "View all users" button.
-
Click on your user you just made (see below).
Optional: click the "x" next to "Update Password" and Save this first tab if you wish.
Now you can click the Credentials tab, and then enter a new password that is 12 characters and follows the 2/2/2/2 rule. 2 upper, 2 lower, 2 special character and 2 numbers in the password. Click the "Temporary" if you want to turn that off. Then click "Reset Password" and verify.

Next make sure that the OpenRMF Realm is created in Keycloak. To do this: execute the setup-realm script from the Keycloak directory that you unzipped previously. It will ask you for the IP address that you bound KeyCloak to. Use the IP address you see in your browser window when opening the Keycloak GUI.
Keycloak is setup! On to Step 2.
You also possibly use another OpenID compliant application to provide AuthN and AuthZ. I have not tested any other than Keycloak for now.
This is a VERY, VERY important step. In the OpenRMF zip file with all the scripts to run this locally, you have a .env file that is with the rest of the files. You need to expand that ZIP file into a separate directory just for OpenRMF scripts.
You may not see it if on Linux or Mac, so you will need to run ls -al or something similar to see it. You must edit this file that looks like the YAML below and in the 'xxx.xxx' area put your IP address that Keycloak is running on. It should be the same machine you are doing all this on more than likely. It is the same IP you entered in the "Enter your IP" step for Keycloak setup if you used one of the automated setup scripts for Keycloak. If you did the manual steps, use the IP address of the machine Keycloak is running on (run ipconfig or ifconfig).
This .env file is with the OpenRMF files separate from the rest. It is read in when you launch OpenRMF and put into an environment variable for the Docker Compose run containers specifically so the APIs can authenticate requests.
JWT-AUTHORITY=http://xxx.xxx.xxx.xxx:9001/auth/realms/openrmf
JWT-CLIENT=openrmf
Ok, now that you have setup Keycloak and you have the .env file setup right, you can go on to Step 3. Running OpenRMF!
Now, where you have the .env file from above and all the scripts and YML files, you can run start.sh or start.cmd for OpenRMF to start. This will pull down any containers from DockerHub you need and then launch them all. There are several APIs, message clients, MongoDB databases, metrics exporters, Grafana, and the web interface to put together and run. All of this is in the docker-compose.yml file that is run. Let it start all the pieces up and get everything working. There are a lot of pieces here, so you may want to up your allowable Memory for Docker Desktop to 4GB if you can. And possibly 4 or 6 CPUs depending on your setup. You will need to play with your settings for performance.
When all the pieces are running you will see a message on "open a local browser to http://{ip-address}:8080/". That means you are ready to go. Open a web browser, point to that URL, and you should get a Keycloak login page. Make sure you DO NOT use http://localhost/ as "localhost" means something specific with Docker images. Use the IP of the machine with all these pieces running.
The data is currently mapped to internal Docker-managed volumes for persistence. You can run the "docker volume rm" command below if you wish to remove and start over as you test. If you want persistence you could change the connection strings to another MongoDB server and adjust the docker-compose.yml accordingly. Or use a volume in your docker-compose.yml or individual docker commands.
Enter your Login username/password combination and you should get to the OpenRMF Dashboard page. If this is a new setup you will have no data at all. It will show 0 systems, 0 checklists, 0 user templates, etc. Click on the Systems menu or the green Systems listing on the Dashboard. That takes you to the System page.
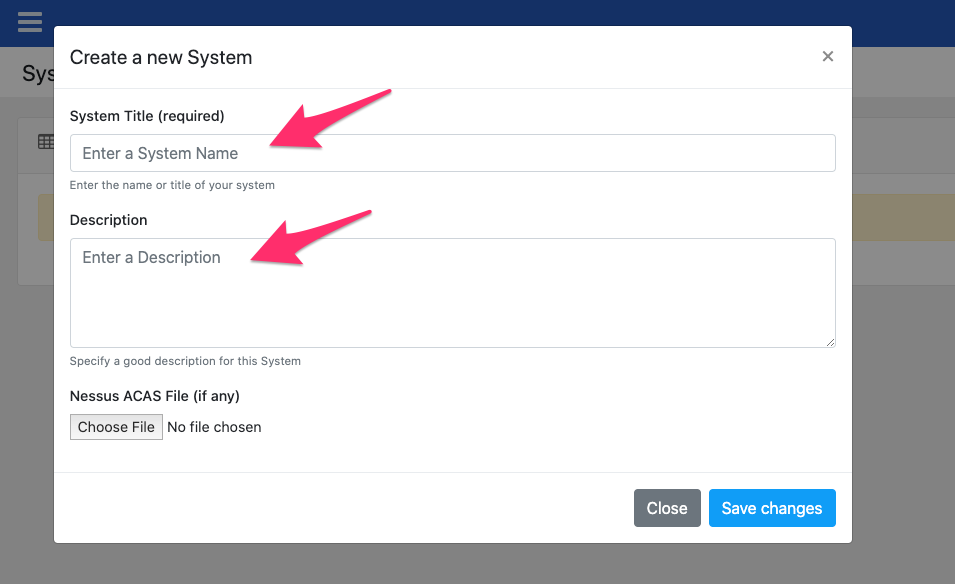
You will see a note on "There are no Systems in here. Please add your first System or Upload your first checklist to get started.". To do that click the blue "Add" button near the top right of that page. (If you do not see it, your permissions are not setup for Editor or Administrator. Fix that in Keycloak for your user roles.) Enter a title and description, and add a Nessus ACAS export XML file if you have one. Then click Save Changes.
You are now at the System information screen but you have 0 checklists. To add a checklist, you either need the .CKL file from the DISA Java Viewer or another tool. Or you need a SCAP scan XCCDF results XML file.
If you do not have any checklist files, visit https://github.com/Cingulara/openrmf-web/tree/master/examples to get some examples to use and download the raw files.
When you have at least one of those types of files, you can click the Upload button in the System Information area of the System screen. You will go to the Upload page referencing your System.
On the Upload page, make sure your system is selected in the dropdown and click the "Choose Files" button. You can add up to 10 files at a time on this screen. When done it will tell you how many files were successful, and list any that may have problems for you to fix and try again later.

When done uploading click the Systems menu at the top left of OpenRMF. You will see your System listed, with the number of checklists uploaded and your total overall "Score". The score in OpenRMF shows the number of open, not a finding, not reviewed, and not applicable items per checklist or for the whole system. This is the whole system view.
Click the System title linked and you go back to the System page. You should see the score pie chart, buttons to generate documents, and then your list of checklists along with a checklist filter. Check / un-check options on the filter and click Apply to show checklists that have those kinds of categories and status on vulnerabilities.
Click on the checklist green plus sign to see a breakdown of its vulnerability listings. Click the checklist name linked to open a screen to see all the items for that checklist.
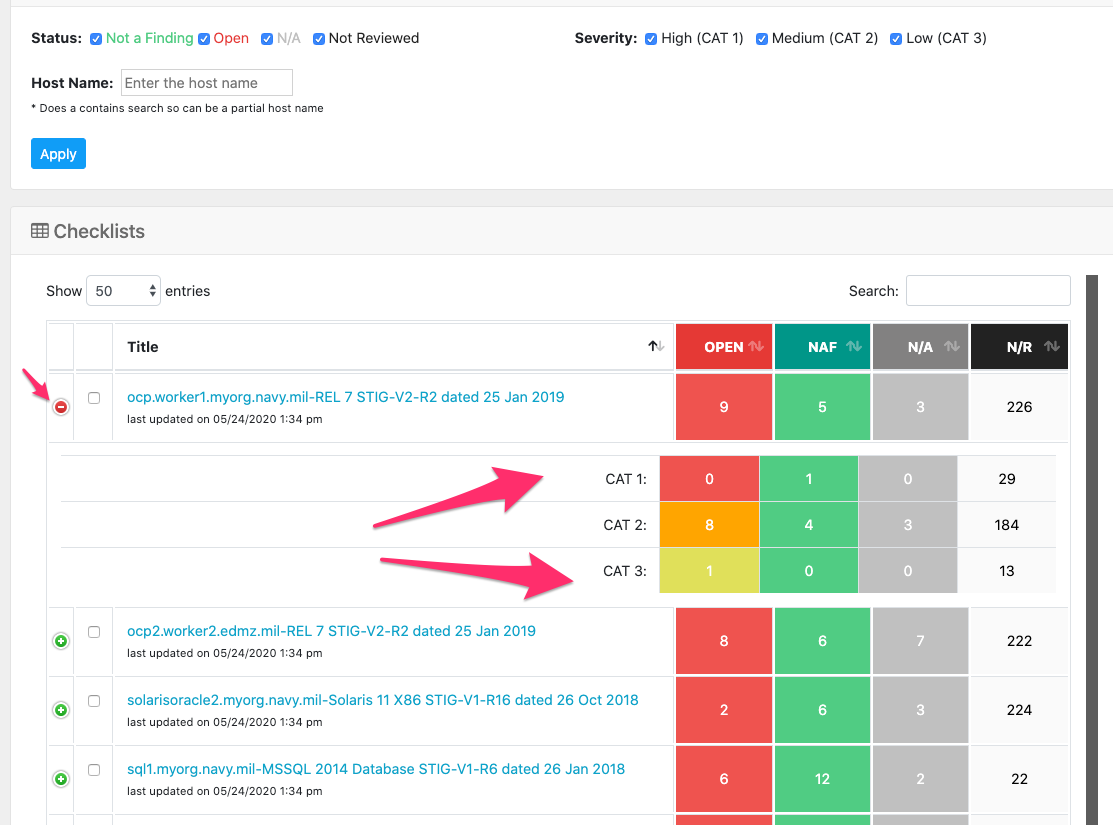
Once you view the checklist you can see the title, the host, the version and release of the checklist and other information on the left. On the right you see a table of the score for checklist vulnerabilities. Each number is hyperlinked to the list of vulnerabilities below to quickly filter your listing for what you are looking for.
You are also notified if your version or release of the checklist has an update from DISA. If so, you can click a button to upgrade it to the latest and all data/notes/status is copied from the older one to the newer one! Yes you read that correctly! :^)

Where the vulnerabilities are listed, you can click the vulnerability and the details loads as well as the NIST RMF controls referenced. The Status and Comments area shows that data. If you have Edit or Admin rights, you can click Edit and update the finding details, comments, status, and other data. Saving this data will automatically update the score and reporting data if the status is changed.

Now that you have data loaded, you can hunt around the rest of the application to see what it has!
On the reports page you can click on each report to run that report and see what data returns.
The Audit page shows when people add systems, upload checklists, etc.
The Compliance page lets you specify a system, the impact level (right now just Low, Medium, and High) and specify if you need the PII and Privacy data controls applied. Click the Generate button and the controls will go against every single checklist in your system and map all vulnerability items per status into a map and listing for you within minutes (or less!).

For those that want to run the actual "latest" or "edge" of OpenRMF you should run git clone https://github.com/Cingulara/openrmf-docs.git , then git checkout develop to switch to the develop branch. Inside the scripts directory there is an edge directory with ./dev-start.sh (or .\dev-start.cmd on Windows) file to run to start and a corresponding ./dev-stop.sh (.\dev-stop.cmd on Windows) to run the latest development version. These operate on http://{ip-address}:8080 as well. Note the docker-compose.yml has different database mount volumes as well.
This would take the place of Step 3 above. All the rest of the steps are the same in the right order.