

XBIR NeoPixel is for controlling NeoPixel Ring and/or Strip with Xbox DVD Movie Playback Kit. It's for the original Xbox, but for other project with modification.
- Xbox Power ON/OFF
- Fully controlling of the NeoPixel
- Possible to add multiple NeoPixels (See example)
- Custom Remote Control
| Part | Qty | Shops |
|---|---|---|
| Arduino Pro Micro Leonardo 5V/16Mhz | 1 | Any clones will work Make sure they're the 5V/16Mhz variant. |
| NeoPixel Ring - 24 x 5050 RGB LED with Integrated Drivers 5V | ∞ | Any will work I recommend with Integrated Drivers. Make sure they're the 5V variant. |
| Relay Module 1-Channel High Level Trigger 5V | 1 | Any will work Make sure they're the 5V variant. |
| IR (Infrared) Receiver Sensor | 1 | TSOP 1556 Or any other IR (Just check pinout) |
| Remote Control | 1 | Xbox DVD Movie Playback Kit Or any other Remote |
| Resistor 330Ω | 4 | Any Resistor 330Ω Or any resistor in series with total values 330Ω |
| Resistor 10kΩ | 2 | Any Resistor 10kΩ Or any resistor in series with total values 10kΩ |
| Capacitor 1000uf | 1 | Any Capacitor |
| Some Wires | ∞ | Any wires |
XBIR NeoPixel uses the open-source Arduino Software (IDE):
- Download the Arduino IDE And install it!
Adafruit_NeoPixel Library & IRremote Library Open the IDE and click to the "Sketch" menu and then Include Library > Manage Libraries.
- In
Filter your search...enterAdafruit_NeoPixelinstall it or update it. - In
Filter your search...enterIRremoteinstall it or update it. - In
Typeselectupdatableand update all libraries which would appear.
XBIR_NeoPixel Library
- Clone this repository to your PC
- Or Download Zip
Extract toXBIR_NeoPixelor renameXBIR_NeoPixel-mastertoXBIR_NeoPixel
-
open
/XBIR_NeoPixel/Configs.hwith editor and edit what you want
In Arduino IDEConfigs.happear after openingXBIR_NeoPixel.ino
You can edit:- NUM_PIXELS (Number of NeoPixels on Ring and/or Strip)
- PIXEL_TYPE (The order of primary colors in the NeoPixel data stream can vary among device types, manufacturers and even different revisions of the same item)
- USE_ORIGINAL (if you want to use xbox original dvd remote)
- USE_CUSTOM (if you want to use a custom remote control) See: Custom Remote Control
- SETTINGS (General settings)
-
Program Pro Micro, open
/XBIR_NeoPixel/XBIR_NeoPixel.inowith Arduino IDE. -
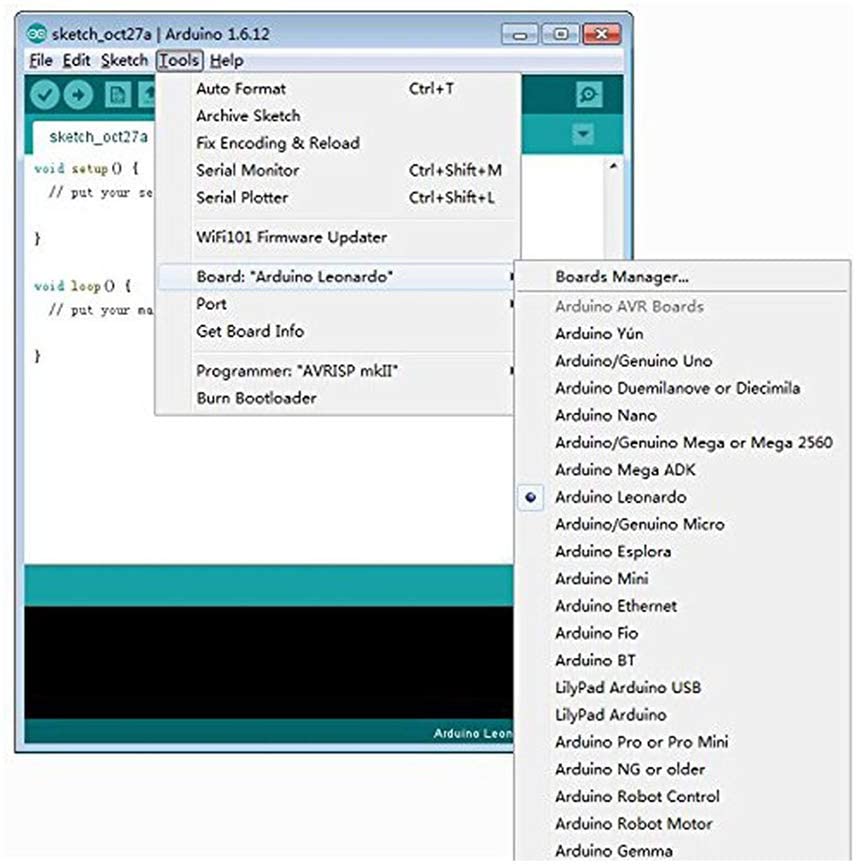
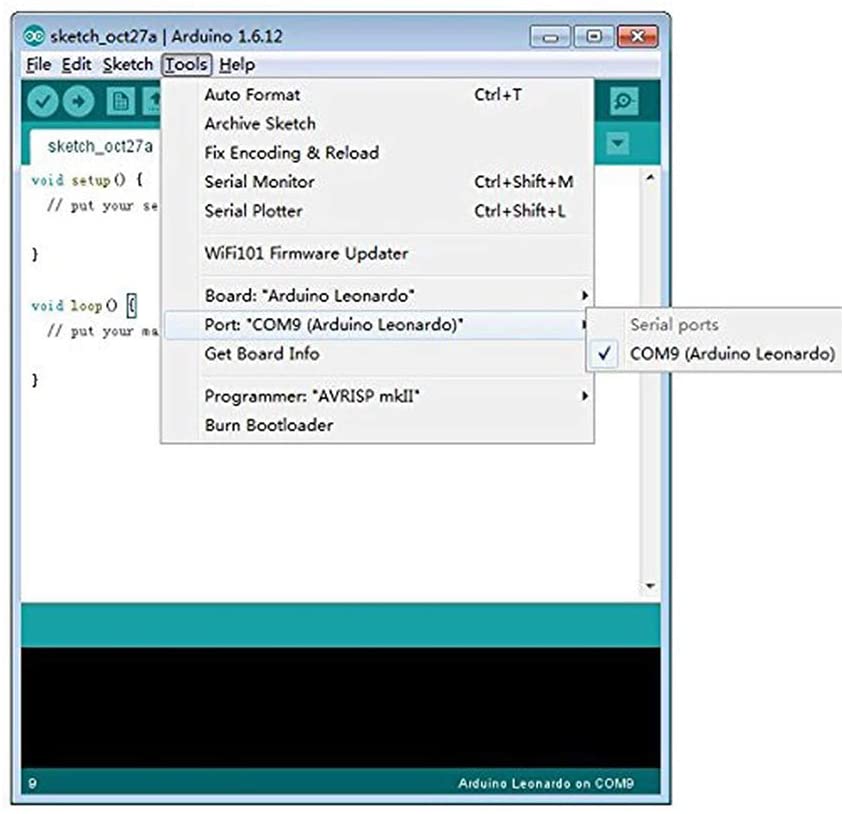
Set the Board Type the Arduino Leonardo and the port correctly.
-
Compile by clicking the tick in the top left.
Check the console output it has compiled successfully -
Connect a Micro USB cable between the Pro Micro and the PC.
-
Click the upload button and confirm successful.
-
Disconnect Pro Micro


Use PC Connection for this or connect only TSOP on Pro Micro
- Enable Debug Mode, open
/XBIR_NeoPixel/resources/lib/Log.hwith editor
Uncomment below to enable debug output and save file.for// #define DEBUG_MODE#define DEBUG_MODE
- Program Pro Micro, open
/XBIR_NeoPixel/XBIR_NeoPixel.inowith Arduino IDE. - Compile by clicking the tick in the top left.
Check the console output it has compiled successfully - Connect a Micro USB cable between the Pro Micro and the PC.
- Click the upload button and confirm successful.
- Open console output by clicking the magnifying glass in the top right.
- Press any key on your remote and look your codes in console.

- Open
/XBIR_NeoPixel/resources/lib/XBIRRemote.hwith editor.
Edit CUSTOM section with your new codes - Save
/XBIR_NeoPixel/resources/lib/XBIRRemote.h - Comment DEBUG_MODE to disable debug output in
/XBIR_NeoPixel/resources/lib/Log.hand save file.// #define DEBUG_MODE - Enable USE_CUSTOM in
/XBIR_NeoPixel/Configs.hand save file. - Finally, program again your Pro Micro.

Want to contribute? Great!
Open pull requests
This article is intended to provide general information.
Please always read and follow the labels/instructions that accompany your products.
I cannot be held responsible for any injuries or damages caused by this activity.
Cheers!!!