This code example shows how you can run Cloud Dataflow pipelines from App Engine apps, as a replacement for the older GAE Python MapReduce libraries, as well as do much more.
The example shows how to periodically launch a Python Dataflow pipeline from GAE, to analyze data stored in Cloud Datastore; in this case, tweets from Twitter.
This example uses the Dataflow SDK to launch the pipeline jobs. Because of its use of the SDK, it requires App Engine Flex. For an example that uses the same pipeline, but uses Dataflow Templates to launch the pipeline jobs, see the 'job_template_launch' directory, which uses App Engine Standard. Now that Dataflow Templates are available, they are likely the more straightforward option for this type of task in most cases, so you may want to start with the 'job_template_launch' directory.
The example is a GAE app with two services (previously, 'modules'):
-
a GAE Standard service that periodically pulls in timeline tweets from Twitter and stores them in Datastore; and
-
a GAE Flexible service that periodically launches a Python Dataflow pipeline to analyze the tweet data in the Datastore.
The Python Dataflow pipeline reads recent tweets from the past N days from Cloud Datastore, then essentially splits into three processing branches. It finds the top N most popular words in terms of the percentage of tweets they were found in, calculates the top N most popular URLs in terms of their count, and then derives relevant word co-occurrences (bigrams) using an approximation to a tf*idf ranking metric. It writes the results to three BigQuery tables.

Follow the "Before you begin" steps on this page. Note your project and bucket name; you will need them in a moment.
For local testing (not required, but may be useful), follow the next section on the same page to [install pip and the Dataflow SDK](https://cloud.google.com/dataflow/docs/quickstarts/quickstart- python#Setup).
The app will write its analytic results to BigQuery. In your project, create a new dataset to use for this purpose, or note the name of an existing dataset that you will use.
Create a Twitter application.. Note the credentials under the 'Keys and Access Tokens' tag: 'Consumer Key (API Key)', 'Consumer Secret (API Secret)', 'Access Token', and 'Access Token Secret'. You'll need these in moment.
- We need to 'vendor' the libraries used by the app's frontend.
Install the dependencies into the app's
libsubdirectory like this:
pip install --target=lib -r standard_requirements.txt(Take a look at appengine_config.py to see where we specify to GAE to add those libs).
-
Then, edit
app.yamlto add the Twitter app credentials that you generated above. -
Edit the
Dockerfileto specify the env vars for yourPROJECT, GCSBUCKET, andDATASETnames, created as described above. (For the bucket, do NOT add the 'gs://' prefix; just use the name).
The example app is essentially 'headless', with no user-facing frontend. It would be straightforward to add user-facing content, but as is, it just runs two app cron jobs: one to periodically pull tweets from Twitter and add them to the Datastore, and one to periodically analyze the tweet data. The analysis results are written to BigQuery.
More specifically, the app consists of two services: a GAE Standard service, which fetches tweets and stores them in the Datastore; and a GAE Flex service, which launches a Dataflow pipeline to analyze the tweet data. Both are triggered by App Engine cron jobs.
So, the app has four .yaml files.
There is one for each service: app.yaml (which
uses main.py) and backend.yaml (which uses main_df.py).
The GAE flex service is a custom runtime,
and it uses the Dockerfile and requirements.txt
in this directory when it builds and deploys.
Then, the app has a dispatch.yaml file that specifies how to route requests to
the two services; and a cron.yaml file that defines the cron jobs.
Deploy the parts of the app like this, in this order:
gcloud app deploy app.yaml
gcloud app deploy backend.yaml
gcloud app deploy dispatch.yaml
gcloud app deploy cron.yaml
If you change something in either service's script, you only need to re-deploy that .yaml file.
You don't need to redeploy the dispatch file again unless you change the routing. If you should want
to change the cron job timings, just edit and redeploy the cron.yaml file.
To test your deployment, manually trigger the cron jobs. To do this, go to the cloud console for your project, and visit the App Engine pane. Then, click on 'Task Queues' in the left navbar, then the 'Cron Jobs' tab in the center pane.
Then, click Run now for the /timeline cron job. This is the job that fetches tweets and stores
them in the Datastore. After it runs, you should be able to see Tweet entities in the Datastore.
Visit the Datastore pane in the Cloud
Console, and select Tweet from the 'Entities' pull-down menu. You can also try a GQL query:
select * from Tweet order by created_at desc
Once you know that the 'fetch tweets' cron is running successfully, click Run now for the
/launchpipeline cron. This should kick off a Dataflow job and return within a few seconds. You
should be able to see it running in the Dataflow pane
of the Cloud Console. It should finish in a few minutes. Check that it finishes without error.
Once it has finished, you ought to see three new tables in your BigQuery dataset: urls,
word_counts, and word_cooccur.
If you see any problems, make sure that you've configured the app.yaml and Dockerfile as
described above, and check the logs for clues.
Note: the /launchpipeline request handler is configured to return without launching the pipeline
if the request has not originated as a cron request. You can comment out that logic in main_df.py,
in the launch() function, if you'd like to override that behavior.
If you'd like, you can directly run the main_df.py script, which launches the Dataflow pipeline,
locally. You might find this easier if you're trying to debug some change you've made. To do this,
first make sure you've followed
these instructions.
Make sure you have all the required dependencies by running
the following in your virtual environment:
pip install --target=lib -r requirements.txtThen, set the necessary environment vars in your shell (changing the following for your correct values):
export PROJECT=your-project
export BUCKET=your-bucket-name
export DATASET=your-dataset-name
Then, edit main_df.py and in launch(), comment out the code that checks that the request has
the 'X-Appengine-Cron'header.
Then run:
python main_df.pyThe script will start a web server on localhost port 8080.
Visit http://localhost:8080/launchpipeline.
That should kick off the Dataflow pipeline deployment.
Once our example app is up and running, it periodically writes the results of its analysis to BigQuery. Then, we can run some fun queries on the data.
For example, we can find recent word co-occurrences that are 'interesting' by our metric:

Or look for emerging word pairs, that have become 'interesting' in the last day or so (as of early April 2017):

We can contrast the 'interesting' word pairs with the words that are simply the most popular within a given period (you can see that most of these words are common, but not particularly newsworthy):

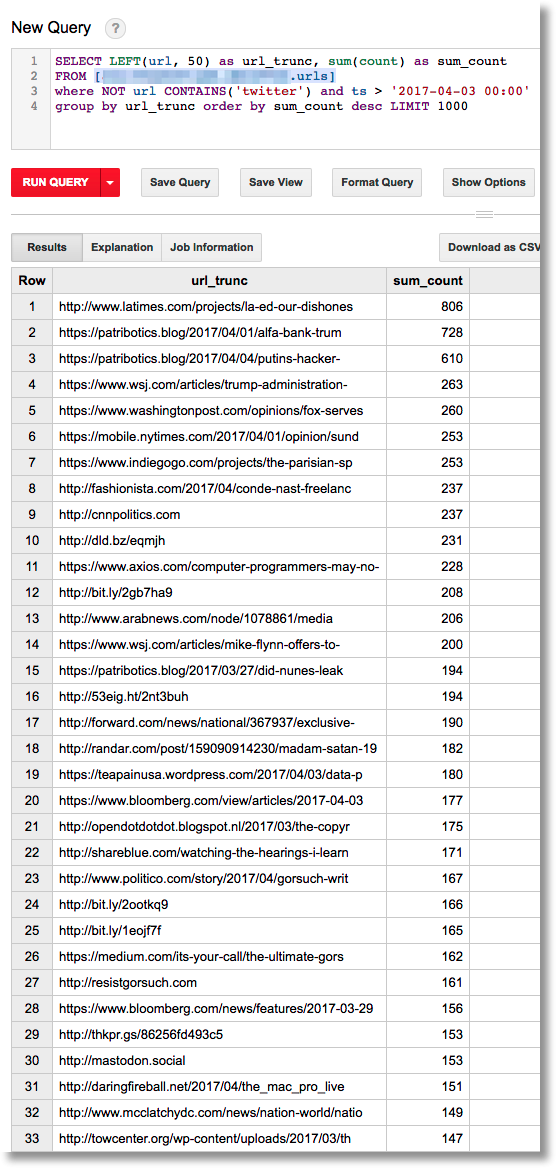
Or, find the most often-tweeted URLs from the past few days (some URLs are truncated in the output):
This example walks through how you can programmatically launch Dataflow pipelines — that read from Datastore — directly from your App Engine app, in order to support a range of processing and analytics tasks.
There are lots of interesting ways that this example could be extended. For example, you could add a user-facing frontend to the web app, that fetches and displays results from BigQuery. You might also look at trends over time (e.g. for bigrams) -- either from BigQuery, or by extending the Dataflow pipeline.
Contributions are not currently accepted. This is not an official Google product.