In this exercise, we will use the new Jakarta EE Security API (JSR 375) to secure a Web application.
Start a new Maven project and select "Web Application" and give it a meaningful name, ex. "hol-security", click "Next".
Select "GlassFish" as the application server and "Java EE7 Web", we will update the Java EE API version later. Validate and you should now have an empty project.
Select the project's pom.xml, under "Project Files". Now you can update the project to use Jakarta EE / Java EE 8 APIs but just updating the version number of the dependency.
 <dependency>
    <groupId>javax</groupId>
    <artifactId>javaee-api</artifactId>
    <version>8.0</version>
    <scope>provided</scope>
 </dependency>
💡 This Lab is only using APIs from the Jakarta EE 8 Web Profile which is a subset of the Full platform.
We will now create a Servlet-based Web application that we will then secure using the new Jakarta EE Security API.
Right click on the project, select "new" and "servlet". Make sure to specify a package where you code will reside, eg. "org.j1hol" and click "next" then "finish".
💡 We need to make sure to enable CDI. For that, we need to create an empty beans.xml in the WEB-INF directory. Beans.xml can also be used to customise the CDI container; when it's empty, it's just a marker file that tell the application server that CDI is used.
In the project, locate the WEB-INF directory under "Web Pages" and right click to create an empty file called beans.xml
💡 Even tough the file looks empty, it's not as it's size is 1 byte. That means that GlassFish will parse it so it has to be a valid XML file. Just add to make sure that it is indeed a valid XML file. So instead of an empty file, we have have created a valid empty xml file!
Navigate to the servlet source that has just been created and locate the processRequest method.
Update it as follows
 protected void processRequest(HttpServletRequest request, HttpServletResponse response)
            throws ServletException, IOException {
    response.setContentType("text/html;charset=UTF-8");
    try (PrintWriter out = response.getWriter()) {
        out.println("<!DOCTYPE html><html><body>");
        out.println("<div style=\"font-size:150%;font-weight:100;font-family: sans-serif;");
        out.println("text-align: center;color: DimGray;margin-top: 40vh;line-height: 150%\">");
        out.println("Jakarta EE 8 HoL<br/>");
        out.println(request.getAuthType());
        out.println("</div></body></html>");
    }
 }
Now right click and select "Run File". This action will compile and deploy our Web Application to GlassFish 5, NetBeans will then launch the browser to test it.
If it works, you will simply see the text produced by the processRequest method "Jakarta EE HoL".
💡 When testing your application, always make sure to connect to the servlet and not to the index.html that NetBeans also creates!
We now have a simple CDI enabled Servlet 4.0 basic application that we will secure using the Jakarta EE Security API.
In a pre Jakarta EE application, we would have to rely on application servers specific feature to configure this (ex. XML file, Admin Console, etc). In Jakarta EE, it is simple and portable as the Jakarta EE Security API introduces annotations to cope with different authentications mechanisms: @BasicAuthenticationMechanismDefinition, @FormAuthenticationMechanismDefinition, CustomFormAuthenticationMechanismDefinition.
In the servlet class source, you should have the following annotation
@WebServlet(name = "NewServlet", urlPatterns = {"/test"})➡️ We are specifying to GlassFish Web container that this class is a servlet and that its url is "/test" (under the the context of the Web application).
You can now add the following annotations:
@DeclareRoles({"foo", "bar"})➡️ This annotation specifies that our application will work with 2 types of user roles: foo & bar.
@ServletSecurity(@HttpConstraint(rolesAllowed = "foo"))➡️ This annotation specifies security constraints to be enforced by the Servlet container on HTTP protocol messages, i.e. only user of role "foo" will be allowed.
@BasicAuthenticationMechanismDefinition(realmName="HOL-basic" )➡️ This annotation specifies to the container that it should use the HTTP basic access authentication mechanism, it will be made available as an CDI enabled bean. The realmName pass in parameter will be used in the WWW-Authenticate header.
 @EmbeddedIdentityStoreDefinition({
    @Credentials(callerName = "david", password = "david", groups = {"foo"}),
    @Credentials(callerName = "ed", password = "ed", groups = {"bar",}),
    @Credentials(callerName = "michael", password = "michael", groups = {"foo"})}
 )
➡️ This annotation is used to specify which IdentityStore to use, in this case, we will use the Embedded Identity Store which require to directly specify our users.
To compile your code, you need to add the Soteria dependency to your pom.xml
<dependency>
<groupId>org.glassfish.soteria</groupId>
<artifactId>javax.security.enterprise</artifactId>
<version>1.0</version>
<scope>provided</scope>
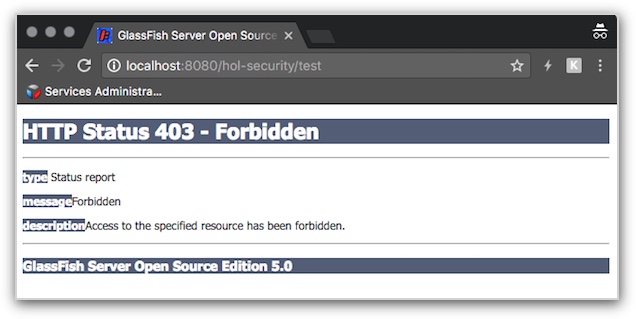
</dependency>Now you can test the application, david and michael should be able to log in the application while ed should be rejected (HTTP Status 403 - Forbidden) as he doesn't have the approrpiate "foo" role. This error page is obviously customizable but that is beyond the scope of this exercise.
💡 To avoid caching issue, just start Chrome in Incognito mode each time you want to test authentication.
In the previous step, you saw that it was possible to easily secure a web application in a portable way! To illustrate the concepts, we have used an EmbeddedIdentityStore which, by design, is not secure. The Java EE Security API defines IndentityStore that are designed to cope with modern applications, namely the LdapIdentityStore and the DatabaseIdentityStore which be used to (securely!) store users information respectvely in a LDAP and in a database. These stores can be configured using the @LdapIdentityStoreDefinition and the @DatabaseIdentityStoreDefinition annotations.
The Java EE Security API can be extended. In this exercise, we will evolve our application to use a custom IndentityStore instead of the EmbeddedIdentityStore. In the interest of time, the IndentityStore we will focus on how to validate a user and not how to retreive his/her details from a secure store.
In the servlet class, remove or comment the @EmbeddedIdentityStoreDefinition annotation. Now create a java class named TestIdentityStore.java. As this class will implement an IndentiyStore, it has to implement the IndentityStore interface. Also make sure the class has the Application scope by annotating it with @ApplicationScoped as below.
 @ApplicationScoped
 public class TestIdentityStore implements IdentityStore {
 ...
NetBeans will complain that some imports are missing, fix those.
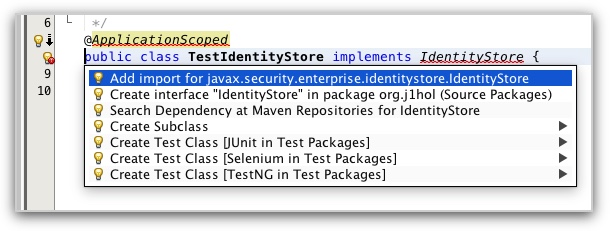
 import javax.enterprise.context.ApplicationScoped;
 import javax.security.enterprise.identitystore.IdentityStore;
We need to implement the validate method. This method will receive a credential object for the user trying to access the application and will validate the user against his/her details stored somewhere. For this exercise, we will simply store those details in an in-memory map, which again is not very secure! In a real application, your custom IdentityStore would fetch the user information from a secure store.
Add this code to create and populate the map that will hold our users.
 private static final Map<String, String> unsecureStore = new HashMap<>();

 public TestIdentityStore() {
    // Don't do this at home, highly unsecure!
    unsecureStore.put("david", "DAVID");
    unsecureStore.put("ed", "ED");
    unsecureStore.put("lisa", "LISA");
    unsecureStore.put("michael", "MICHAEL");
 }
💡A IdentityStore can store user details, role information or both. In our exercise, we are taking another shortcut as the profile is simply based on the user name; i.e. the default profile is "foo" unless the user name contains "a", in this case her/his profile is "bar".
Implement the validate method as follow.
 public CredentialValidationResult validate(UsernamePasswordCredential usernamePasswordCredential) {

    String caller = usernamePasswordCredential.getCaller();
    String pwd = usernamePasswordCredential.getPasswordAsString();

    // just for the exercise, assign the role based on the user name
    String role = "foo";
    if ( caller.contains("a") ) {
       role = "bar";
    } // else foo!

    if (usernamePasswordCredential.compareTo(caller,unsecureStore.get(caller))) {
       // return a VALID result with the caller and the set of groups s/he belongs to.
       return new CredentialValidationResult(caller, new HashSet<>(asList(role)));
    }
    return INVALID_RESULT;

 }
This method simply takes the credentials object, get the caller (the user) from this object,and compare the password from the crendential object against the password of that user in the map. Based on the user, it also assign him/her a role.
Once all the imports are fixed, run and test the application. Ed should be the only one allowed to log in as he his the only one with the "foo" role. Make sure to open an incognito Chrome windows to test this.
In this exercise, we have secured our Web application using the Basic Authentication, one of the authentication mechanisms provided out-of-the-box by the Security API for EE. Under the hood, it uses the HttpAuthenticationMechanism, a new interface introduced by the Security API. This interface is used to define authentication mechanism for Servlet applications, to define a mechanism that obtains a caller's credentials in some way, using the HTTP protocol. Implementations are expected and encouraged to delegate the actual credential validation and/or retrieval of the caller name with optional groups to an IdentityStore. That is how the authentication mechanism that we have used do and as you saw, we have used the Basic Authentication and we were able to easily switch from one the EmbeddedIdentityStore to our custom IdentityStore.
To learn more about the Security API, you can check at your leisure
- How to write a custom authentication mechanism
- How to use the SecurityContext
- Java EE Security API specification