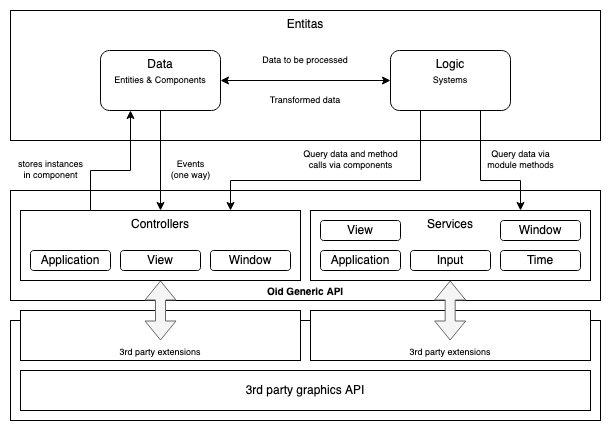
Data: The game state. Data such as health, inventory, experience, enemy type, ai state, movement speed etc. In Entitas these data live in Components.
Logic: The rules for how the data can be transformed. PlaceInInventory(), BuildItem(), FireWeapon() etc. In Entitas these are Systems.
Feature: A subset of Systems logically grouped together to allow enabling/disabling of related logic.
View: The code responsible for displaying the game state to the player, rendering, animation, audio, ui widget etc. In my examples these will be instances of Oid::Components::ViewElement living on StageEntity.
Services: Outside sources and sinks for information e.g. Pathfinding, Leaderboards, Anti-Cheat, Social, Physics, even the game engine itself. These communicate with 3rd pary libraries/apis such as the RayLib graphics library for rendering.
Input: Outside input to the simulation, usually via limited access to parts of the game logic e.g. controller / keyboard / mouse input, network input.
All services should extend Oid::Service
Example of creating a service module
# Define a service and extend the service module
class DebugLogService
  include Oid::Service::Logger
  spoved_logger

  def log(msg : String)
    logger.info(msg)
  end
end

# Register the service by creating a helper class that has a reference to each service in it
register_services(
  {
    name:    :logger,
    service: DebugLogService,
  }
)

# Create the services class
services = Services.new(
  logger: DebugLogService.new
)- application
- camera
- config
- input
- logger
- time
- view
- window
All services should extend Oid::Controller
- application
- view
- window
OID has some built in systems that will help manage the application and states for you. These are bundled together into features.
To include the base OID system include Oid::BaseSystems when building your AppController
class AppController < Entitas::Controller
  getter services : Oid::Services = Oid::Services.new(
    application: RayLib::ApplicationService.new,
    logger: RayLib::LoggerService.new,
    input: RayLib::InputService.new,
    config: ExampleConfigService.new(**RAYLIB_CONFIG),
    time: RayLib::TimeService.new,
    view: RayLib::ViewService.new,
    camera: RayLib::CameraService.new,
    window: RayLib::WindowService.new
  )

  def create_systems(contexts : Contexts)
    Entitas::Feature.new("Systems")
      .add(Oid::ServiceRegistrationSystems.new(contexts, services))
      .add(Oid::BaseSystems.new(contexts))
  end
endThis feature combines all the base features and systems that are needed for a basic application to run.
Includes systems:
Oid::Systems::AddPositionComponents- Ensures every entity has a position componentOid::Systems::RelationshipManager- Manages parent/child relationships between entitiesOid::Systems::MultiDestroy- Will destroy all entities marked for distruction (accross all contexts)
Included features:
Oid::Feature::EventSystemsOid::Feature::AppSystemsOid::Feature::MovementSystemsOid::Feature::InputSystemsOid::Feature::ViewSystems
This feature combines the autogenerated event system for the default App and Stage contexts.
Includes systems:
App::EventSystemsStage::EventSystems
This feature combines systems that manage the overall state of the application as well as its window and camera.
Includes systems:
Oid::Systems::WindowMangement- manages application window stateOid::Systems::CameraManager- manages application cameraOid::Systems::Application- manages application state
This feature combines systems that manage entity position translations.
Includes systems:
Oid::Systems::Move
This feature combines systems that manage input.
Includes systems:
Oid::Systems::EmitInput
This feature combines systems that manage the rendering of of entities by the application.
Includes systems:
Oid::Systems::AddObjectBounds- calculates the bounds of a entityOid::Systems::AddView- Allows rendering of the entityOid::Systems::HiddenManger- Will hide the entity and prevent rendering
It is not necissary to use the built in Oid::BaseSystem if you do not want some of its included features/systems. You can mix and match by creating your own feature like so:
create_feature MyFeature, [
  Oid::Feature::EventSystems,

  # Application management
  Oid::Feature::AppSystems,

  # Entity management
  Oid::Systems::AddPositionComponents,
  Oid::Systems::RelationshipManager,
  Oid::Systems::MultiDestroy,

  # Remove movement and input system
  # Oid::Feature::MovementSystems,
  # Oid::Feature::InputSystems,
  Oid::Feature::ViewSystems,
]
This example creates a MyFeatureSystem which can be subsituted for Oid::BaseSystem which will have no movement and will not listen for input.
Oid has built in support for basic texture atlases. Currently it supports the raylib formatting of Texture Atlases, which can be generated using rTP.
An XML based atlas file should look like this:
<AtlasTexture imagePath='pieces.png' width='1024' height='1024' spriteCount='7' isFont='0' fontSize='32'>
    <Sprite nameId='Blocker' originX='0' originY='0' positionX='768' positionY='0' sourceSizeWidth='128' sourceSizeHeight='110' padding='0' trimmed='0' trimRecX='0' trimRecY='0' trimRecWidth='128' trimRecHeight='110' />
    <Sprite nameId='Piece0' originX='0' originY='0' positionX='0' positionY='0' sourceSizeWidth='128' sourceSizeHeight='128' padding='0' trimmed='0' trimRecX='0' trimRecY='0' trimRecWidth='128' trimRecHeight='128' />
    <Sprite nameId='Piece1' originX='0' originY='0' positionX='128' positionY='0' sourceSizeWidth='128' sourceSizeHeight='128' padding='0' trimmed='0' trimRecX='0' trimRecY='0' trimRecWidth='128' trimRecHeight='128' />
    <Sprite nameId='Piece2' originX='0' originY='0' positionX='256' positionY='0' sourceSizeWidth='128' sourceSizeHeight='128' padding='0' trimmed='0' trimRecX='0' trimRecY='0' trimRecWidth='128' trimRecHeight='128' />
    <Sprite nameId='Piece3' originX='0' originY='0' positionX='384' positionY='0' sourceSizeWidth='128' sourceSizeHeight='128' padding='0' trimmed='0' trimRecX='0' trimRecY='0' trimRecWidth='128' trimRecHeight='128' />
    <Sprite nameId='Piece4' originX='0' originY='0' positionX='512' positionY='0' sourceSizeWidth='128' sourceSizeHeight='128' padding='0' trimmed='0' trimRecX='0' trimRecY='0' trimRecWidth='128' trimRecHeight='128' />
    <Sprite nameId='Piece5' originX='0' originY='0' positionX='640' positionY='0' sourceSizeWidth='128' sourceSizeHeight='128' padding='0' trimmed='0' trimRecX='0' trimRecY='0' trimRecWidth='128' trimRecHeight='128' />
</AtlasTexture>
Example atlases are found at examples/assets/atlas. RayLib atlas formats that are supported are xml, json and rtpa.
You can then add the atlas as asset to an entity:
 context.create_entity
      .add_asset(
        name: "atlas/pieces.xml",     # path of atlas file relative to the defined "asset" path
        type: Oid::Enum::AssetType::TextureAtlas
      )
This will load the texture defined at imagePath relitive to the atlas file. To load sub textures, it is the same as with a Texture, only use the AssetType of SubTexture instead:
      context.create_entity
      .add_actor(name: "my_sub_texture")
      .add_position(Oid::Vector3.new(130, 100, 10))
      .add_position_type(Oid::Enum::Position::Relative)
      .add_asset(
        name: "Piece0",
        type: Oid::Enum::AssetType::SubTexture
      )
      .add_scale(1.0)