For more detailed instructions with images, click here: http://www.ibm.com/developerworks/cloud/library/cl-cloudtrader-app/index.html
Eclipse for Java EE Developers http://www.eclipse.org/downloads/packages/eclipse-ide-java-ee-developers/neonr
Bluemix Eclipse plugin https://marketplace.eclipse.org/content/ibm-eclipse-tools-bluemix
- Clone the source code locally.
git clone https://github.com/IBM-Bluemix/CloudTrader.git - Launch Eclipse. File > Import > General > Existing Projects into Workspace > Select root directory > [Point to the CloudTrader src]. You should now see the CloudTrader project (with code) in your Project Explorer view.
- In Eclipse, right-click the Servers view and select New > Server. If you don't see the Servers view in Eclipse, make sure you are in the Java EE perspective and look in the bottom section for the Servers tab.
- In the Define a New Server window, expand the IBM folder, select IBM Bluemix, and click Next.
- Enter your credentials for your Bluemix account.
- Click on Validate Account, then click Finish.
- You can now drag and drop the CloudTrader project onto the Bluemix server you just created.
- You will be presented with a wizard. Choose a unique name for your application to prevent name collisions on the ng.bluemix.net domain.
- On the next panel, you can select the URL and Memory information. Accept the defaults and click Next.
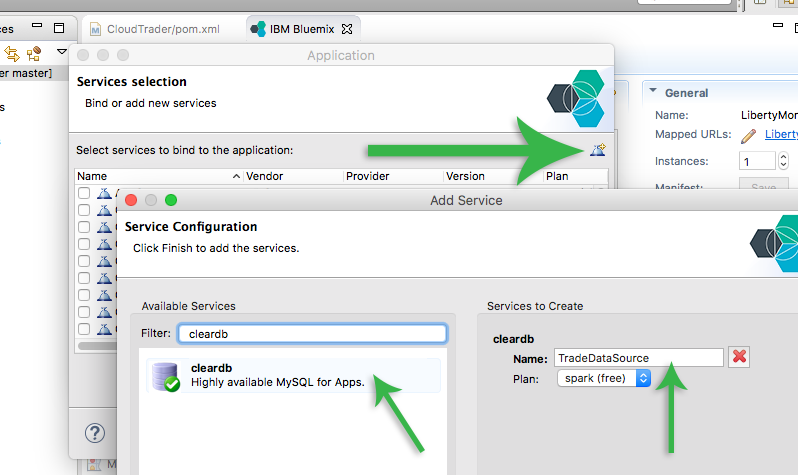
- On the Services selection panel, we will create the services the application needs. For now, we will only create the database service. Click on the Add Service Icon for the add service window icon near the top right to open the Add Service window. Select cleardb.
- For the Name, enter TradeDataSource. Bluemix will create the necessary configuration so that CloudTrader can look for this datasource with this JNDI name.
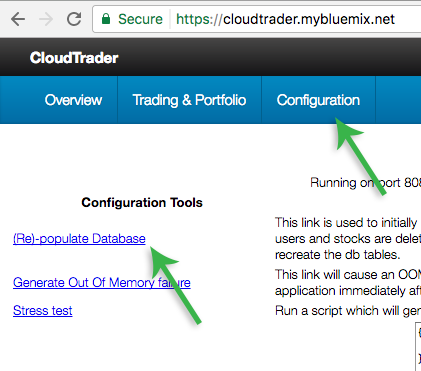
Click Finish on both wizards. Within a couple of minutes, your application should be deployed to the route you choose. Visit your application and click on Configuration -> (Re)-populate Database.
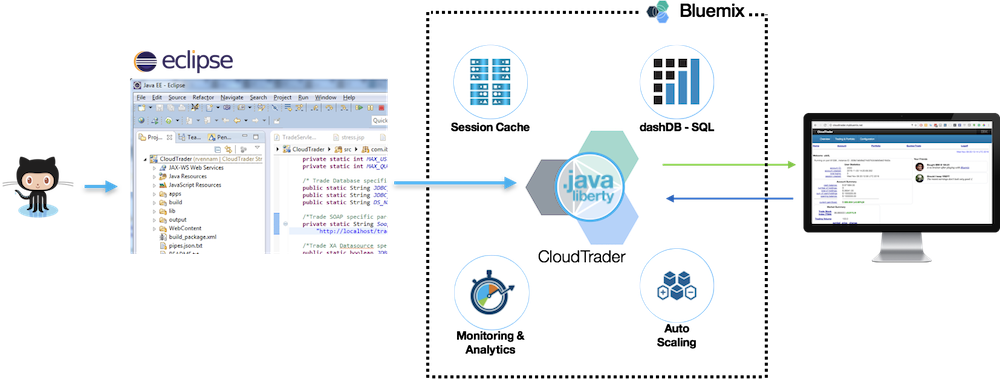
After it's deployed, add these other optional services: Monitoring & Analytics Auto-Scaling and Session Cache. No changes are needed to the source code to leverage these services.
Download mysql-connector-java-5.1.32.jar
and place it in $LIBERTY_HOME/wlp/usr/shared/resources/mysql. If mysql directory does not exist, create it.
    <dataSource id='sql-datasource' jdbcDriverRef='mysql-driver' jndiName='jdbc/TradeDataSource'>
        <properties databaseName="xxxxxxxx"
            user="xxxxxxxxx"
            password='xxxxx'
            portNumber="xxxx" serverName="xxxxxxxxx"
            driverType="4"
            driverClass="com.mysql.jdbc.Driver" />
    </dataSource>

    <jdbcDriver id="mysql-driver" libraryRef="mysql-library" />

    <library id="mysql-library">
        <fileset dir="${shared.resource.dir}/mysql" includes="*.jar"/>
    </library>
Download DB2 JDBC Driver from https://www-01.ibm.com/support/docview.wss?uid=swg21363866
Unzip the downloaded zip file using command line to get the jar. (On OS X, you might get a cpgz file if you don't use command line)
unzip ./db2_db2driver_for_jdbc_sqlj_v11.1.zip
Copy the db2jcc4.jar to $LIBERTY_HOME/wlp/usr/shared/resources/db2. If db2 directory does not exist, create it.
Add the following datasource config to your Liberty server.xml. Replace the values with your database credentials
    <dataSource id='sql-datasource' jdbcDriverRef='db2-driver' jndiName='jdbc/TradeDataSource'>
        <properties databaseName="XXXXX"
            user="xxxxx"
            password='xxxxxx'
            portNumber="50000"
            serverName="xxxxx.xxx.com"
            driverType="4"/>
    </dataSource>

    <jdbcDriver id="db2-driver" libraryRef="db2-library" />

    <library id="db2-library">
        <fileset dir="${shared.resource.dir}/db2" includes="*.jar"/>
    </library>