Hello World
Let's now create our first Hello World program ! In programming, the Hello World program is usually the first exercise you do in order to learn a new language or a new framework. As we are using a GUI framework, we are going to display a simple label with the text "Hello World !".
You can see the result of this tutorial by running the command :
cargo run --example hello_worldIn order to display a label in a window, we must first create a window. Let's do this. Create a new Rust binary project and add the neutrino crate in your Cargo.toml. Go to main.rs and write the following code :
use neutrino::{App, Window};

fn main() {
    let mut window = Window::new();
    window.set_title("Hello World");
    window.set_size(320, 240);

    App::run(window);
}
Run your code. You should get something like that :

So what is this code doing ? First we get from neutrino the App and Window structs. Then we create a Window, we set its title and its size. After that we give the Window to the App which then runs.
Okay, now we have a window. But we are not finished yet... Remember, we wanted to display a Hello World ! text in our window. For that we will need a Widget. Widgets are the objects we draw in the Window. For now, we will use the Label widget.
With our new Label, main.rs should now looks like that :
use neutrino::{App, Window};
use neutrino::widgets::label::Label;
fn main() {
let mut label = Label::new("my_label");
label.set_text("Hello World !");
let mut window = Window::new();
window.set_title("Hello World");
window.set_size(320, 240);
window.set_child(Box::new(label));
App::run(window);
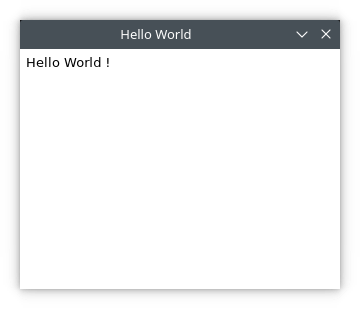
}Here is the result :
The code is not much different from what we wrote in the beginning. We only added one line to tell Rust we were using Label, and two lines to effectively create the Label and set its text. In the end, we set the Label we just created as the child of the Window. A Window can only have one child. However you can use the Container and Tabs widgets to add more widgets to the Window and build complex GUI.
Now you should be able to display widgets in the Window. Look into the docs to see how you can use all the other widgets.