This document provides deeper information about the project, to be used in conjunction with the README file.
The Terraform script creates a cluster using the Amazon EKS Blueprints for Terraform. Agones and Open Match are deployed when the clusters are bootstrapped.
Certificates CA and key files required for TLS communictions are generated by certmanager. Certmanager is enabled in the Terraform definition as an add-on of the EKS blueprints.
The EKS Blueprints enables metrics and logging for the EKS clusters. Metrics are exported to CloudWatch to provide observability on the clusters.
The diagrams below illustrate the creation process in the README file. You can follow it using the links on each diagram. After each diagram you can find additional details about that stage.

The first Terraform stage deploys our clusters to the chosen regions, as well as underlining infrastructure, like VPCs and subnets. You can examine the clusters in the AWS Console or using the aws eks CLI.

Now our main components (Agones, Open Match) are deployed. Cert-manager was configured to provide TLS certificates.
Since the Agones Allocator Service endpoints are not public, we will use kubectl port-forward and curl to access them. To test if cert-manager and Agones are correctly deployed and configured, and if we can reach the allocator, run this:
sh scripts/test-agones-tls.sh $CLUSTER1
sh scripts/test-agones-tls.sh $CLUSTER2
This code executes commands against the clusters to get the address of the Agones Allocator. It executes the curl command to call the service using the certificate, key and CA files created during the deployment of Agones.
After messages about kubectl context and port-forward, you should see a message like this for each cluster:
{"code":8, "message":"there is no available GameServer to allocate", "details":[]}
This is the Agones Allocator answering that it can't allocate any game server. That's the expected behavior, since we didn't deploy any game server yet.
If you receive a different message, use sh -x scripts/test-agones-tls.sh and/or add -v after the cluster variable, and examine the output.
The commands on this section build the image, push it to the ECR repository, and use it to deploy 4 fleets of ncat game servers on each cluster. It uses the value of each REGION where the cluster is located to tag the fleets, which we will use later when allocating game servers depending on the region they are located:
About the ncat and supertuxkart fleet files: These files deploy the Agones Fleet CRDs. A
Fleetis a set of warmGameServersthat are available to be allocated from. You can inspect the content of the files on the folders ./fleets/ncat and ./fleets/stk.
In addition to the kubectl get fleets and kubectl get gameservers commands to verify the status of the fleets and game servers, we can test the Allocator Service with curl, in a way similar to what we did after the deployment of the clusters.
Let's run the updated test code below:
# We will be testing the allocation to the servers on the gameservers namespace
sh  scripts/test-gameserver-allocation.sh agones-gameservers-1 us-east-1
sh  scripts/test-gameserver-allocation.sh agones-gameservers-2 us-east-2
You should see a similar result for each cluster:
Updated context "arn:aws:eks:us-east-1:xxxxxxxxxxxxxx:cluster/agones-gameservers-1 in <local user path>/.kube/config".
- Allocating server -
{"gameServerName":"ncat-pool2-zr5xn-nc9cz","ports":[{"name":"default","port":7256}],"address":"ec2-3-84-182-165.compute-1.amazonaws.com","nodeName":"ip-192-168-7-36.ec2.internal"}

- Display game servers -
NAME                     STATE       ADDRESS                                    PORT   NODE                           AGE     LABELS
ncat-pool2-zr5xn-nc9cz   Allocated   ec2-3-84-182-165.compute-1.amazonaws.com   7256   ip-192-168-7-36.ec2.internal   2m9s    agones.dev/fleet=ncat-pool2,agones.dev/gameserverset=ncat-pool2-zr5xn,pool=TWO,region=us-east-1
... Removed unallocated servers ...

Switched to context "xxxxxxxxxxxxxxxx@agones-gameservers-2.us-east-2.eksctl.io".
- Allocating server -
{"gameServerName":"ncat-pool3-qwgcq-p8ntr","ports":[{"name":"default","port":7403}],"address":"ec2-3-143-205-47.us-east-2.compute.amazonaws.com","nodeName":"ip-192-168-37-221.us-east-2.compute.internal"}

- Display game servers -
NAME                     STATE       ADDRESS                                            PORT   NODE                                           AGE    LABELS
ncat-pool3-qwgcq-p8ntr   Allocated   ec2-3-143-205-47.us-east-2.compute.amazonaws.com   7403   ip-192-168-37-221.us-east-2.compute.internal   115s   agones.dev/fleet=ncat-pool3,agones.dev/gameserverset=ncat-pool3-qwgcq,pool=THREE,region=us-east-2
... Removed unallocated servers ...
Observe that the server address returned by the curl command is the same that appears as Allocated on the kubectl get gameservers output.

With the game servers deployed, we put the allocator to work, answering our allocation requests with the IP of the allocated server on the same cluster, and marking it as Allocated.
In the previous test, we did a local allocation request to each cluster, and received a game server allocated in the same cluster. Multi-cluster Allocation enables Agones to allocate game servers in other Agones clusters. To request a multi-cluster allocation, we simply add "multiClusterSetting":{"enabled":true} to the curl --data payload of the test we already used, as in the code below. Please, try it:
sh scripts/test-gameserver-multicluster-allocation.sh agones-gameservers-1 us-east-1It seems we are not ready yet, Agones does not like it and complains two times with.
{"error":"no multi-cluster allocation policy is specified","code":2,"message":"no multi-cluster allocation policy is specified"}So, let's configure the multi-cluster policy. We will do this on the agones-gameservers-1, since it will be our "home" or "router" cluster, that will accept allocations to itself and to agones-gameservers-2.
- Store the addresses of the Agones allocators for both clusters. We will need this in our policies:
export CLUSTER1=agones-gameservers-1
export CLUSTER2=agones-gameservers-2
export ALLOCATOR_IP_CLUSTER1=$(sh scripts/set-allocator-ip.sh ${CLUSTER1} us-east-1)
export ALLOCATOR_IP_CLUSTER2=$(sh scripts/set-allocator-ip.sh ${CLUSTER2} us-east-2)- Switch the kubernetes context to
agones-gameservers-1:
export CLUSTER_NAME="agones-gameservers-1"
export REGION="us-east-1"
kubectl config use-context $(kubectl config get-contexts -o=name | grep ${CLUSTER_NAME})- Creating the multi-cluster policies
To enable Agones multi-cluster configuration, we use the GameServerAllocationPolicy. We need to define a policy for each cluster used to allocate game servers, including the local cluster. First, let's take a look at the multi-cluster configuration files:
multicluster-allocation-1.yaml
# Configures local multi-cluster allocation on agones-gameservers-1
apiVersion: multicluster.agones.dev/v1
kind: GameServerAllocationPolicy
metadata:
  name: allocator-policy-to-local-cluster
  namespace: agones-system
spec:
  connectionInfo:
    clusterName: "agones-gameservers-1"
    namespace: gameservers
  priority: 1
  weight: 100
multicluster-allocation-1-to-2.yaml
# Configures remote multi-cluster allocation from agones-gameservers-1 to agones-gameservers-2
apiVersion: multicluster.agones.dev/v1
kind: GameServerAllocationPolicy
metadata:
  name: allocator-policy-to-cluster-2
  namespace: agones-system
spec:
  connectionInfo:
    allocationEndpoints:
    - ${ALLOCATOR_IP_CLUSTER_2}
    clusterName: "agones-gameservers-2"
    namespace: gameservers
    secretName: allocator-secret-to-cluster-2
  priority: 1
  weight: 100
Notes:
- The policy for the local cluster doesn't have a
spec.connectionInfo.allocationEndpointsfield. - On the remote cluster file, we will use
envsubstto import the value of the variables${ALLOCATOR_IP_CLUSTER_2}, to thespec.connectionInfo.allocationEndpoints. spec.connectionInfo.namespacecontains the namespace where the game servers are running in the target clusters. The Namespace specified in the allocation request (like in thecurltests) is used to refer to the namespace that the GameServerAllocationPolicy itself is located in,agones-systemin our case.spec.connectionInfo.secretNamepoints to a secret that holds the cert, key and ca of the target cluster. We will create this secret in the next step.- Game servers will be allocated from clusters with the lowest priority number. If there are no available game servers available in clusters with the lowest priority number, they will be allocated from clusters with the next lowest priority number.
- For clusters with the same priority, the cluster is chosen with a probability relative to its weight.
To create the policies, run:
kubectl apply -f multicluster-allocation-1.yaml
envsubst < multicluster-allocation-1-to-2.yaml | kubectl apply -f -- Establish a certificate trust between both clusters
To accept allocation requests from other clusters, Agones' allocator for cluster
agones-gameservers-2should accept the client’s certificate from clusteragones-gameservers-1and the clusteragones-gameservers-1’s client should be configured to accept the server TLS certificate, if it is not signed by a public Certificate Authority (CA). You can read more about this process on the Establish trust section of the Multi-cluster Allocation documentation.
To configure agones-gameservers-1 trust certs, run:
kubectl create secret generic \
--from-file=tls.crt=client_agones-gameservers-2.crt \
--from-file=tls.key=client_agones-gameservers-2.key \
--from-file=ca.crt=ca_agones-gameservers-2.crt \
allocator-secret-to-cluster-2 -n agones-system
This will create the secret allocator-secret-to-cluster-2 in the agones-system namespace:
apiVersion: v1
data:
  ca.crt:  <REDACTED>
  tls.crt: <REDACTED>
  tls.key: <REDACTED>
kind: Secret
metadata:
  name: allocator-secret-to-cluster-2
  namespace: agones-system
type: Opaque- Test multi-cluster allocation from cluster 1 to cluster 2
First, let's delete all game servers on both clusters, so we remove the already allocated game servers, and have a clearer output on our test. Agones fleets will recreate the deleted game servers and leave all on Ready state:
for context in $(kubectl config get-contexts -o=name | grep agones-gameservers);
do
    kubectl config use-context $context
    kubectl delete --all gs -n gameservers
done
Now, we can test the policies with the updated code below:
sh scripts/test-gameserver-multicluster-allocation.sh agones-gameservers-1 us-east-1
sh scripts/test-gameserver-multicluster-allocation.sh agones-gameservers-2 us-east-2
And we receive an output similar to this for each cluster:
Switched to context "xxxxxxxx@agones-gameservers-1.us-east-1.eksctl.io".
- Allocating server -
{"gameServerName":"ncat-pool3-qwgcq-mtwf7","ports":[{"name":"default","port":7334}],"address":"ec2-3-143-205-47.us-east-2.compute.amazonaws.com","nodeName":"ip-192-168-37-221.us-east-2.compute.internal"}
- Display ALLOCATED game servers only -

Switched to context "xxxxxxxx@agones-gameservers-2.us-east-2.eksctl.io".
- Allocating server -
{"error":"no multi-cluster allocation policy is specified","code":2,"message":"no multi-cluster allocation policy is specified"}
- Display ALLOCATED game servers only -
ncat-pool3-qwgcq-mtwf7   Allocated   ec2-3-143-205-47.us-east-2.compute.amazonaws.com   7334   ip-192-168-37-221.us-east-2.compute.internal   14s
Please observe the sequence on the example above:
- The script switches to the first cluster
- Request the allocation to the first cluster endpoint, that is successful and show one allocated game server
- List the allocated game servers on the first cluster, showing none
- The script Switches to the second cluster
- Request the allocation to the second cluster endpoint, that will fail because we didn't configure multi-cluster allocation and trust on the second cluster yet
- List the allocated game servers on the first cluster, showing one server
Your output may show the game server allocated to the first cluster, because we are using the same priority and weight on our allocation policies, you have 50% chance of the game server being allocated on each cluster. Please, repeat the tests a few more times, you should see game servers being randomly allocated to each cluster.

The image below shows the typical configuration of Open Match.
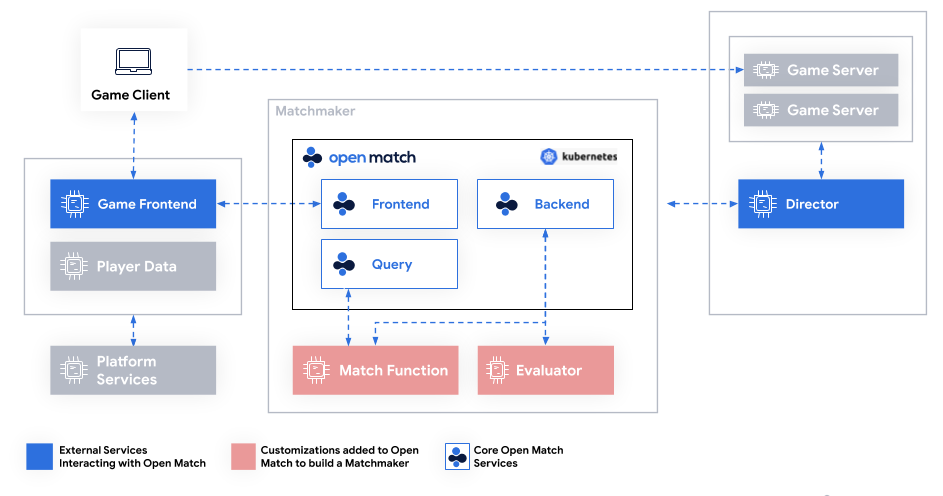
The core Open Match Services are deployed to the open-match namespace. We will add customizations and external services to the cluster to integrate Open Match and Agones. Both components will communicate to handle whole matchmaking and game server allocation.
For simplicity, we bypass the Game Frontend, that could handle tasks like user authentication, leaderboards, and chat. We use a Game Client that connects directly to Open Match's Frontend. We deploy customized versions of the Match Function and the Director that are using the latency between the client and the game server to match players. Players with similar latencies are matched and the Agones allocator allocates a gameserver in the region with the lower latency.
 Open Match - Agones matchmaking and game server allocation flow
The diagram above shows our matchmaking and allocation process:
- The client request a game session
- Open Match processes the request from multiple clients, matching them based on their latencies to the game servers regions, and asks Agones for a game server allocation
- Agones allocates a game server on the cluster closest to the clients and returns its address to Open Match (remote clusters not shown on the diagram)
- The client receives the game server address from Open Match and initiates a game session with the server
In the diagram, the blue arrows show the standard Open Match flow, explained on Matchmaking using Open Match. Our integration explained on this current section shows the tasks needed to enable the red arrow between Open Match Director and Agones Allocator.
This repository contains code and documentation for the customized versions of Open Match director and matchfunction on the folders ./integration/director/ and ./integration/matchfunction/, as well as the client tools we used in the folder ./integration/clients/. Please, refer to the documentation on each folder for more details about them.
We will deploy and test the customizations to the cluster 1.
- Switch the kubernetes context to
agones-gameservers-1
export CLUSTER_NAME="agones-gameservers-1"
export REGION="us-east-1"
kubectl config use-context $(kubectl config get-contexts -o=name | grep ${CLUSTER_NAME})- Deploy the Open Match matchmaking function
sh scripts/deploy-matchfunction.sh agones-gameservers-1 us-east-1- Deploy the Open Match Director
sh scripts/deploy-director.sh agones-gameservers-1 us-east-1- Verify that the mmf and director pods are running
kubectl get pods -n agones-openmatch- Check the logs
director
kubectl logs -n agones-openmatch -l app=agones-openmatch-director...
YYYY/MM/DD hh:mm:ss Generated 0 matches for profile profile_double_arg:"latency-us-east-2" max:25
YYYY/MM/DD hh:mm:ss Generated 0 matches for profile profile_double_arg:"latency-us-west-2" max:100 min:75
YYYY/MM/DD hh:mm:ss Generated 0 matches for profile profile_double_arg:"latency-us-east-2" max:50 min:25
YYYY/MM/DD hh:mm:ss Generated 0 matches for profile profile_double_arg:"latency-us-east-1" max:50 min:25
YYYY/MM/DD hh:mm:ss Generated 0 matches for profile profile_double_arg:"latency-us-west-1" max:25
...mmf
kubectl logs -n agones-openmatch -l app=agones-openmatch-mmf...
YYYY/MM/DD hh:mm:ss Generating proposals for function profile_double_arg:"latency-us-west-2" max:100 min:75
YYYY/MM/DD hh:mm:ss Generating proposals for function profile_double_arg:"latency-us-east-1" max:25
YYYY/MM/DD hh:mm:ss Generating proposals for function profile_double_arg:"latency-us-west-1" max:100 min:75
YYYY/MM/DD hh:mm:ss Generating proposals for function profile_double_arg:"latency-us-west-2" max:50 min:25
YYYY/MM/DD hh:mm:ss Generating proposals for function profile_double_arg:"latency-us-east-1" max:25
...In our example, director polls the backend service each 5 seconds, trying to fetch matches from it, and sends the match profiles to the matchmaking function. You can see more details about FetchMatches and MatchProfile on the Director page at Open Match site. The logs on the mmf pod are from connections made by the director, if the latter gets undeployed or scaled to 0, mmf will stop logging.
Here we test the flow of the Open Match - Agones integration. We use the ncat fleet deployment and the contents of the folder integration/ncat/client. You will need to open several terminal windows to run this test. You can find a demo of this test in the Visuals section.
- Ensure that the ncat game servers are running, and you have at least one game server in the
Readystate in one of our clusters (sincedirectoralready has the multi-cluster allocation configured, even if we request a game server to Open Match running on cluster 1, Agones will still allocate a game server on either cluster).
for context in $(kubectl config get-contexts -o=name | grep agones-gameservers);
do
    kubectl config use-context $context
    CLUSTER_NAME=$(kubectl config view --minify -o jsonpath='{.clusters[].name}' | cut -f1 -d.)
    echo "- Display READY game servers on cluster ${CLUSTER_NAME} -"
    kubectl get gameservers --namespace ${GAMESERVER_NAMESPACE} | grep Ready
    echo
done- Get cluster 1 Frontend Load Balancer address, the TLS cert and run the player client
export CLUSTER_NAME="agones-gameservers-1"
export REGION="us-east-1"
kubectl config use-context $(kubectl config get-contexts -o=name | grep ${CLUSTER_NAME})
FRONTEND=$(kubectl get svc -n open-match open-match-frontend-loadbalancer -o jsonpath='{.status.loadBalancer.ingress[0].hostname}')
cd integration/clients/ncat
kubectl get secret open-match-tls-server -n open-match -o jsonpath="{.data.public\.cert}" | base64 -d > public.cert
kubectl get secret open-match-tls-server -n open-match -o jsonpath="{.data.private\.key}" | base64 -d > private.key
kubectl get secret open-match-tls-rootca -n open-match -o jsonpath="{.data.public\.cert}" | base64 -d > publicCA.cert
go run main.go -frontend $FRONTEND:50504  -latencyRegion1 10 -latencyRegion2 30
YYYY/MM/DD hh:mm:ss Connecting to Open Match Frontend
YYYY/MM/DD hh:mm:ss Ticket ID: cdfu6mqgqm6kj18qr880
YYYY/MM/DD hh:mm:ss Waiting for ticket assignment- In three other terminal windows, repeat the steps above. You should have a similar output to the sample below, showing the connection to the Frontend server, the game server assigned to the client and the connection to the game server:
YYYY/MM/DD hh:mm:ss Connecting to Open Match Frontend
YYYY/MM/DD hh:mm:ss Ticket ID: cdfu6mqgqm6kj18qr880
YYYY/MM/DD hh:mm:ss Waiting for ticket assignment
YYYY/MM/DD hh:mm:ss Ticket assignment: connection:"ec2-52-87-246-98.compute-1.amazonaws.com:7062"
YYYY/MM/DD hh:mm:ss Disconnecting from Open Match Frontend
ec2-52-87-246-98.compute-1.amazonaws.com:7062
YYYY/MM/DD hh:mm:ss Connecting to ncat server
<announce> 201.17.120.226 is connected as <user5>.
<announce> already connected: nobody.
<announce> 201.17.120.226 is connected as <user6>.
<announce> already connected: 201.17.120.226 as <user5>.
<announce> 201.17.120.226 is connected as <user7>.
<announce> already connected: 201.17.120.226 as <user5>, 201.17.120.226 as <user6>.
<announce> 201.17.120.226 is connected as <user8>.
<announce> already connected: 201.17.120.226 as <user5>, 201.17.120.226 as <user6>, 201.17.120.226 as <user7>.
- In another terminal window, verify in which cluster our game server was
Allocated, it should have the same address shown in the client windows.
NAMESPACE=gameservers
for context in $(kubectl config get-contexts -o=name | grep agones-gameservers);
do
    kubectl config use-context $context
    CLUSTER_NAME=$(kubectl config view --minify -o jsonpath='{.clusters[].name}' | cut -f1 -d.)
    echo "- Display ALLOCATED game servers on cluster ${CLUSTER_NAME} -"
    kubectl get gameservers --namespace ${NAMESPACE} | grep Allocated
    echo
done- Change the context to this cluster and verify the game servers. Let the command running with the
-wflag to detect state changes.
kubectl get gs -n gameservers -w
NAME                     STATE       ADDRESS                                    PORT   NODE                            AGE
ncat-pool1-m72zl-7l6lp   Allocated   ec2-52-87-246-98.compute-1.amazonaws.com   7062   ip-192-168-4-119.ec2.internal   6m22s
ncat-pool1-m72zl-pdh5j   Ready       ec2-52-87-246-98.compute-1.amazonaws.com   7118   ip-192-168-4-119.ec2.internal   6m22s
ncat-pool2-klwnc-98ccx   Ready       ec2-52-87-246-98.compute-1.amazonaws.com   7198   ip-192-168-4-119.ec2.internal   6m21s
ncat-pool2-klwnc-9whl7   Ready       ec2-52-87-246-98.compute-1.amazonaws.com   7041   ip-192-168-4-119.ec2.internal   6m21s
ncat-pool3-pckx8-79v5h   Ready       ec2-52-87-246-98.compute-1.amazonaws.com   7144   ip-192-168-4-119.ec2.internal   6m20s
ncat-pool3-pckx8-jbqv5   Ready       ec2-52-87-246-98.compute-1.amazonaws.com   7684   ip-192-168-4-119.ec2.internal   6m20s
ncat-pool4-2vkzg-6xwqb   Ready       ec2-52-87-246-98.compute-1.amazonaws.com   7225   ip-192-168-4-119.ec2.internal   6m20s
ncat-pool4-2vkzg-l86t6 Ready ec2-52-87-246-98.compute-1.amazonaws.com 7791 ip-192-168-4-119.ec2.internal 6m20s-
In the terminal windows running the clients, type anything and press enter. You should see the messages replicated to the other client windows.
-
Press
CTRL-Cin all the client windows. This should close the clients. When the last one closes, switch to the window with thekubectl get gs -wcommand. It should show that the allocated server is shutting down (since all the players disconnected) and a new game server is being provisioned, as in the example below
NAME                     STATE       ADDRESS                                    PORT   NODE                            AGE
ncat-pool1-m72zl-7l6lp   Allocated   ec2-52-87-246-98.compute-1.amazonaws.com   7062   ip-192-168-4-119.ec2.internal   6m22s
...
ncat-pool1-m72zl-7l6lp   Shutdown    ec2-52-87-246-98.compute-1.amazonaws.com   7062   ip-192-168-4-119.ec2.internal   13m
ncat-pool1-m72zl-7l6lp   Shutdown    ec2-52-87-246-98.compute-1.amazonaws.com   7062   ip-192-168-4-119.ec2.internal   13m
ncat-pool1-m72zl-52mzz   PortAllocation                                                                                     0s
ncat-pool1-m72zl-52mzz   Creating                                                                                           0s
ncat-pool1-m72zl-52mzz   Starting                                                                                           0s
ncat-pool1-m72zl-52mzz   Scheduled        ec2-52-87-246-98.compute-1.amazonaws.com   7034   ip-192-168-4-119.ec2.internal   0s
ncat-pool1-m72zl-7l6lp   Shutdown         ec2-52-87-246-98.compute-1.amazonaws.com   7062   ip-192-168-4-119.ec2.internal   13m
ncat-pool1-m72zl-52mzz   RequestReady     ec2-52-87-246-98.compute-1.amazonaws.com   7034   ip-192-168-4-119.ec2.internal   2s
ncat-pool1-m72zl-52mzz Ready ec2-52-87-246-98.compute-1.amazonaws.com 7034 ip-192-168-4-119.ec2.internal 2s- You can repeat the process with different values to the
-latencyRegion1and-latencyRegion2flags when calling the client, to verify how it affects the game server allocation.
We can use the fleets in the fleets/stk/ folder and the client in integration/clients/stk/ to test the SuperTuxKart integration with Open Match and Agones, similarly to our ncat example above. You will have to deploy the fleets changing the value export GAMESERVER_TYPE=ncat to export GAMESERVER_TYPE=stk (remove any ncat fleets before, with the command kubectl delete fleets -n gameservers --all), and follow the instructions in the integration/clients/stk/ folder. Be aware that we will need to run 4 instances of the SuperTuxKart client (like we did with our terminal clients in the ncat example), so it can be a bit demanding to your computer resources.

The whole flow of matchmaking and allocation is ready now. Our game clients can access our Frontend Load Balancer, request a game, be matched with opponents with similar latencies and access their game servers.
