This is another PID controller for the Gaggia Classic (Pro) espresso portafilter machine. I didn't want a chunky box hanging out of my otherwise clean coffee machine setup, so I made a PID controller using the ESP8266, MAX6675, and an SSR controlled by a polished web interface optimized for mobile devices. All the parts can be comfortably accommodated within the Gaggia, so it looks just like a stock machine from the outside. It can also still be operated manually without consulting the web interface. The mod is always easily reversible without leaving any traces.
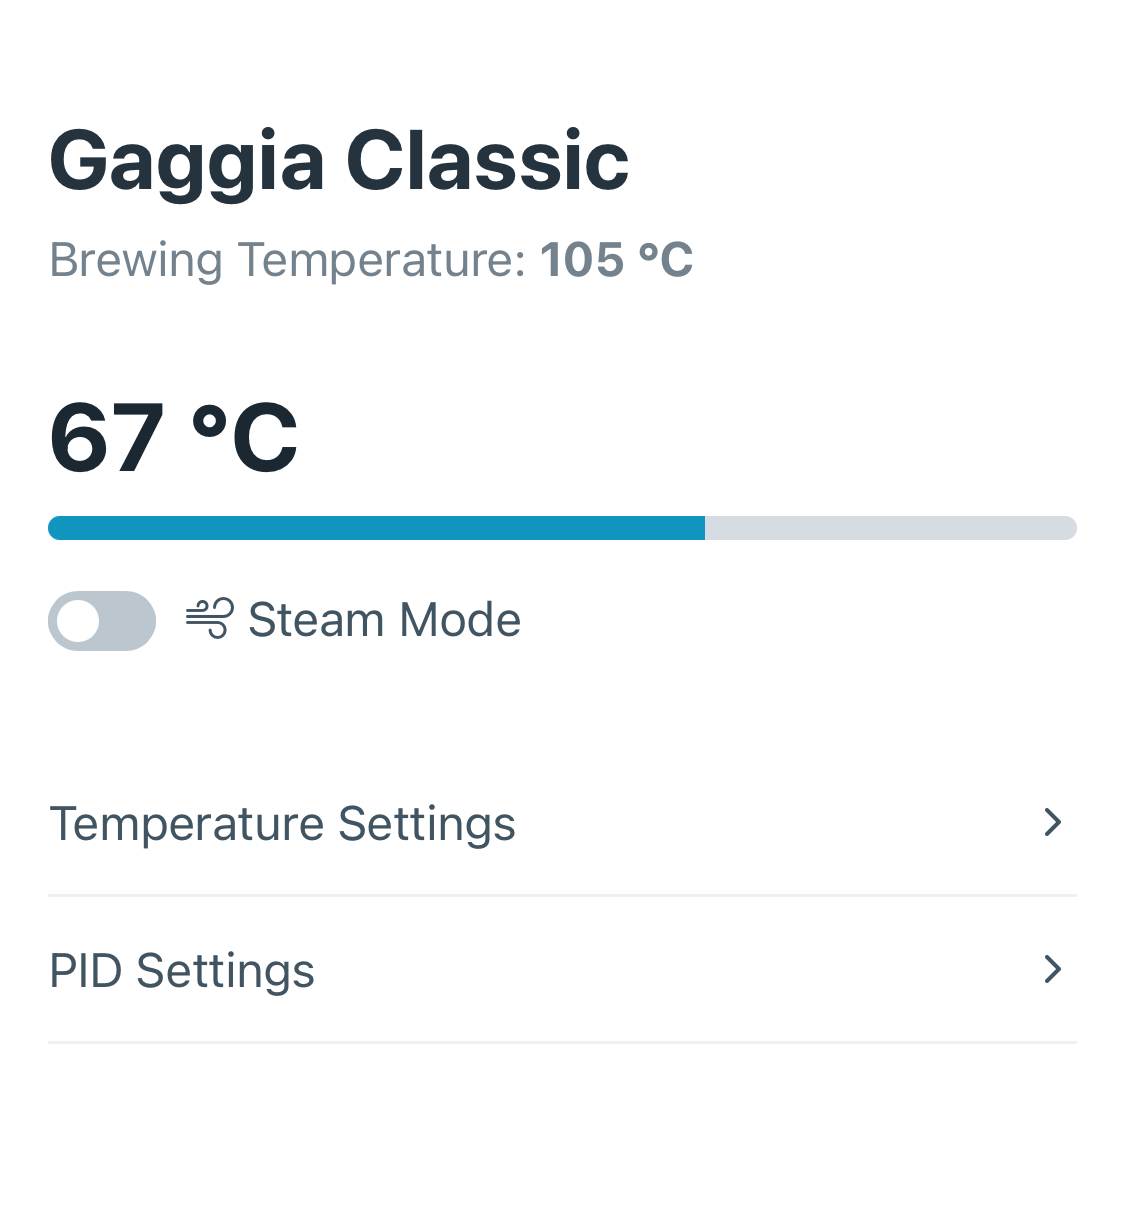
- Check the current temperature of the boiler
- Switch between brewing and steaming mode
- Set the temperature for both brewing and steaming
- Set PID parameters (Kp, Ki, Kd)
- Retain settings throughout reboots (using EEPROM)
This is the bare minimum you will need for this project. I sourced most of the parts from AliExpress. My total costs were around just $15. However, you want to have some 3D-printed enclosure for the hardware, which I did not include in the parts and costs. You will also need tools (screwdrivers, adjustable wrench, soldering iron, solder, double-sided tape, etc.)
Please note that the products linked are not recommended items; they are simply the cheapest and most available when I got them.
- Wemos D1 Mini development board (ESP8266)
- MAX6675 Thermocouple sensor board
- Solid State Relay (40A)
- Generic Mini Power Supply
- M4 threaded Type K thermocouple
- 2x 6.3 mm Piggyback terminals
- 2x 6.3 mm male spade connectors
- 1m 2.5 mm2 wire
- 1m 1.5 mm2 wire
I pretty much followed the steps described in this very well-made video: https://www.youtube.com/watch?v=gj9qLIDaF9g You can just find the layout you want yourself and where you want to hide the parts inside the machine. You can also just route them outside to have easier access to the ESP.
We are going to use esptool to flash the binary to your ESP8266
-
Check the GitHub release tab and download the latest
.binrelease. -
Install Python on your machine (Necessary on Windows, macOS and Linux usually come with Python installed by default)
-
Install esptool by running
pip install esptoolin your command line -
Connect the ESP8266 to your computer and find the serial port
Linux: run
ls /dev/ttyUSB*in your terminalmacOS: run
ls /dev/tty.*in your terminalWindows: Device Manager > Ports (COM & LPT) > Right click on device > Properties > Port Settings
Please note that on Windows, you might also have to install the USB Drivers for the NodeMCU
-
Flash the binary:
esptool.py -chip esp8266 erase_flashexptool.py -chip esp8266 -port <PORT_FROM_STEP_4> write_flash -z 0x1000 /path/to/your/firmware.bin
After you have set up everything and turned on your ESP8266 for the first time, you need to set up the WiFi connection. Search for the WiFi network called "Gaggia Classic" on your phone. It is an open network without password protection. A window will pop up once you connect to it, guiding you through connecting the ESP to your home network. Once the connection is successful, you can reach the control panel by navigating to your ESP8266's IP address (you can find it in your router).
- Progressive Web App (so that the website can be pinned to the home screen)
- Heatup timer
- Autotuning of PID parameters
- Automatic shot timer using solenoid
- Adjust website colors to better fit the topic of coffee
I welcome contributions from coffee enthusiasts and tech wizards alike! If you're interested in improving the project, here's how you can contribute:
-
Fork the Repository: Start by forking the repository to your own GitHub account. This creates a personal copy for you to work on.
-
Clone the Forked Repository: Clone your forked repository to your local machine. This allows you to work on the project in your own development environment.
git clone https://github.com/da-luggas/gaggia-pid-presto.git
cd gaggia-pid-presto
-
Create a New Branch: Before you start making changes, create a new branch. This helps in isolating your changes from the main project.
git checkout -b feature/your-feature-name
-
Make Your Changes: Implement your feature, fix a bug, or make other changes. Ensure your code adheres to the existing style of the project to maintain consistency.
-
Commit Your Changes: Once you're satisfied with your changes, commit them to your branch. Write clear, concise commit messages to explain your changes.
git commit -am "Add a concise and clear description of your changes"
-
Push to GitHub: Push your branch with the changes to your fork on GitHub.
git push origin feature/your-feature-name
-
Create a Pull Request: Go to the original repository on GitHub. You'll see a prompt to create a pull request from your new branch. Fill in the details, explaining the purpose of your changes.
-
Code Review: Wait for the project maintainer to review your changes. Be open to feedback and be ready to make revisions if requested.
-
Once your pull request is approved and merged, your contributions will be part of the project!
-
Don't forget to pull the changes from the original repository to keep your fork up to date.
git checkout main
git pull upstream main
git push origin main
Your contributions play a vital role in the continuous development of this project. Whether it's a minor bug fix, a feature enhancement, or a documentation improvement, every contribution is valuable. Please have a look at the planned features section of this README for some inspirations what could be a good addition to the project.
Happy coding, and enjoy your enhanced coffee experience!