The Openprovider WHMCS module integrates conveniently with your Openprovider account, allowing you to automate many domain provisioning and management tasks, such as registration, renewal, deletion, and updates to contact details.
The module keeps domain expiration dates and auto renew settings synchronized between your WHMCS installation and Openprovider account, making sure the correct domains get renewed each day.
Additionally, the module allows you to use the Openprovider API to check for domain availability, increasing performance over the default domain availability check.
Features
- Domain registrations and transfers
- Domain updates
- Domain availability lookup service
- Domain name spinning service
- Extended Synchronization of domain data
- Domain status synchronization reports
- Renew domains upon transfer completion
- Upload the contents of
/modules/registrars/openproviderfrom this repository to<your WHMCS directory>/modules/registrars/openprovider - Upload the contents of
/includes/hooks/to<your WHMCS directory>/includes/hooks - If you do not have the file
<your WHMCS directory>/resources/domains/additionalfields.phpthen add the example version fromresources/domains/additionalfields.php- Otherwise add the following lines to the top of your
additionalfields.phpfile. :
- Otherwise add the following lines to the top of your
<?php
if (function_exists('openprovider_additional_fields'))
    $additionaldomainfields = openprovider_additional_fields();
- [Optional] Upload
<Module directory>/modules/addons/openproviderto<WHMCS directory>/modules/addons
- Navigate to Configuration >> System Settings >> Domain Registrars and activate Openprovider.
- Enter the credentials for an API user. Ensure API access is enabled in the Openprovier control panel for the credentials you are using.
- Click Save
- Navigate to Configuration >> System Settings >> Domain Pricing and select Openprovider as registrar for the TLD which you want to sell via Openprovider

That's all you need to do to get started selling domains from Openprovider! Additional configurations can be found below.
-
Click "change" to Choose Openprovider as the lookup provider


-
Choose "configure" to select namespinning options
First make sure that the currency that you are using to pay Openprovider is configured in Configuration >> System Settings >> Currencies (prior to WHMCS 8.0, Setup >> Payments >> Currencies) and click on Update Exchange Rate. Otherwise WHMCS will not use premium fee correctly, potentially meaning that your client will pay significantly less for the domain.
- Enable Support premium domains
- Configure premium pricing and margins
- In the Advanced configuration file of the module (
/modules/registrars/openprovider/configuration/advanced-module-configurations.php) find the parameter "OpenproviderPremium" and set to true
Openprovider’s premium DNS leverages Sectigo’s advanced DNS infrastructure to provide a single, integrated and easy to adopt solution which offers a 99.99% Uptime Guarantee and near real-time updates, features DDoS protection and blazing fast resolution. While our standard DNS service is sufficient for users who don’t have any special needs when it comes to DNS resolution, the premium DNS service can be an excellent service to your hosting services portfolio.
- Download the premium dns module from GitHub.
- Copy the contents of
/modules/servers/openproviderpremiumdnsto<your-WHMCS-directory>/modules/servers/openproviderpremiumdns - Set up a product with the Openprovider-premiumDNS module (make sure to require a domain) and start selling. See here for detailed setup instructions.
- Note that there is no test environment and records created with the premium DNS module will be billed to your Openprovider account.
If you plan on allowing your end users to edit their own DNS records, and want them to be able to create all record types supported by Openprovider, you can make some modifications to the WHMCS templates as described here:
- Upload the contents of
<Module directory>/custom-pagesto the top level of your WHMCS folder i.e.<your WHMCS directory>/ - Navigate to the target client profile > domains select the desired domain and under Management Tools activate "DNS Management"
Not all TLDs allow domain locking, but WHMCS assumes that this option is available for all domains. As a result, end users will see a warning "you domain is unlocked" when they visit the domain details page. You can hide this option with the following changes to your template files.
- Open
clientareadomaindetails.tplin the template you are using and replace
{if $lockstatus eq "unlocked"}
with
{$domainSplit = "."|explode:$domain}
{$domainTld = $domain|replace: $domainSplit.0 : ""}
{if $lockstatus eq "unlocked" && $domainTld != '.eu' && $domainTld != '.nl' && $domainTld != '.be'  && $domainTld != '.es'}
Set up tag management to send custom emails to the end users of your resellers.
Various options exist for managing domain renewals. A detailed explanation of your options can be found here
- Create a custom DNS template in the Openprovider control panel (DNS management > Manage DNS templates),
- Put the name of it in the advanced configuration file and any domain created with the Openprovider nameservers will have a DNS zone automatically created on Openprovider nameservers according to your DNS template.
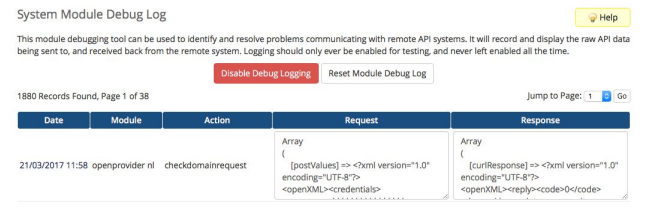
If there are any connectivity issues with Openprovider, or API commands are not working for some reason, the first troubleshooting step should be to look at the API logs. Navigate to Utilities > Logs > Module Logs or <WHMCS directory>/admin/systemmodulelog.php and you can find the raw API commands being sent and received by your WHMCS modules. The responses should contain some information about how the problem can be solved.
Common issues and solutions for them can be found here.
This feature is deprecated since version 5.3 of the Openprovider domain module, and is not recommended for versions WHMCS 8+. We suggest that you use the WHMCS native domain sync and do not use the Openprovider custom sync for WHMCS 8 and higher.


