This is a simple Flask application that uses MongoDB for data storage and Flask-RESTX for building a RESTful API. The application is built using a virtual environment and can be easily installed using pip.
Before you begin, make sure you have the following installed on your system:
- Python 3.6 or higher
- pip
- MongoDB
- Git (optional)
Follow these steps to get started with the application:
- Clone the repository (if you haven't already):
git clone https://github.com/mustafainxiteout/flask-mongo.git
- Create and activate a virtual environment:
  python3 -m venv venv
  venv\Scripts\activate
- Install the required packages using pip:
pip install -r requirements.txt
- Start the Flask application:
flask run
- Open the application in your browser at http://localhost:8000.
This application includes the following features:
- User authentication with Flask-JWT-Extended and hashing password through Restful API
- CRUD operations for managing data
- MongoDB integration for data storage
- Flask-RESTX for building a RESTful API
- Email verification for new user registration
- Password reset email functionality using Flask-Mail and Mailtrap.io
The file structure of this application is as follows:
├── app.py
├── config.py
├── requirements.txt
└── application
    ├── templates
    ├── __init__.py
    ├── models.py
    └── routes.py
app.pycalls the main Flask application.config.pycontains the configuration settings for the application.requirements.txtcontains the required packages for the application.application/__init__.pycontains the configuration for Flask.application/models.pycontains the MongoDB models for the application.application/routes.pycontains the Flask and RESTful API routes.
└── mongodb_files
     ├── courses.json
     └── users.json
courses.jsoncontains courses data to import in mongodbusers.jsoncontains users data to import in mongodb and password of it is hashed and stored in it. For the attached one, The password is12345678.
To access the API endpoints that require authentication, send a POST request to /users/login with a JSON payload containing a valid email_id and password. The API will return a JSON Web Token (JWT) that must be included in the headers of all subsequent requests to authenticated endpoints, using the Authorization: Bearer format.
The API uses the Werkzeug generate_password_hash function to hash passwords before storing them in the database. To check if a password matches the hashed version, use the check_password_hash function.
If a user forgets their password, they can reset it using the /users/forgot_password endpoint. This will send new_password reset with email to the user's email address. The user can then click the link in the email to change to their new password.
When a new user registers, they will receive an email verification email at the email address they provided during registration. They must click the link in this email to verify their account before they can log in.
Mailtrap.io is a cloud-based fake SMTP server that allows software developers and testers to test and preview their email notifications without sending them to real users. It intercepts emails sent from development and staging environments and stores them in a test inbox for review. This allows developers to test the functionality of their email notifications in a safe environment, without risking the delivery of test emails to real users or spamming their inboxes. Mailtrap.io supports a variety of programming languages, frameworks, and tools, including Flask-Mail.
To get started with Mailtrap.io, you need to create an account on their website, and then create an inbox. You will then be given an SMTP username and password for your inbox, which you will use to send emails to your Mailtrap.io inbox.
Flask-Mail is an extension that provides email sending capabilities for Flask applications. To use Mailtrap.io with Flask-Mail, you need to install Flask-Mail:
pip install Flask-Mail
After installing Flask-Mail, you need to configure it in your Flask application:
from flask import Flask
from flask_mail import Mail

app = Flask(__name__)
app.config['MAIL_SERVER'] = 'sandbox.smtp.mailtrap.io'
app.config['MAIL_PORT'] = 2525
app.config['MAIL_USE_TLS'] = True
app.config['MAIL_USE_SSL'] = False
app.config['MAIL_USERNAME'] = 'your_username'
app.config['MAIL_PASSWORD'] = 'your_password'
app.config['MAIL_DEFAULT_SENDER'] = 'from@example.com'

mail = Mail(app)
In the above code, replace your_username and your_password with the SMTP username and password provided by Mailtrap.io.
To send an email with Flask-Mail, you need to create a message object:
from flask_mail import Message

html_body = render_template('verify_email.html', verify_url=verification_url)
msg = Message('Subject', sender='sender@example.com', recipients=['recipient@example.com'])
msg.html = html_body
In the above code, replace sender@example.com and recipient@example.com with the appropriate email addresses.
After creating the message object, you can send the email using the send method of the Mail object:
mail.send(msg)
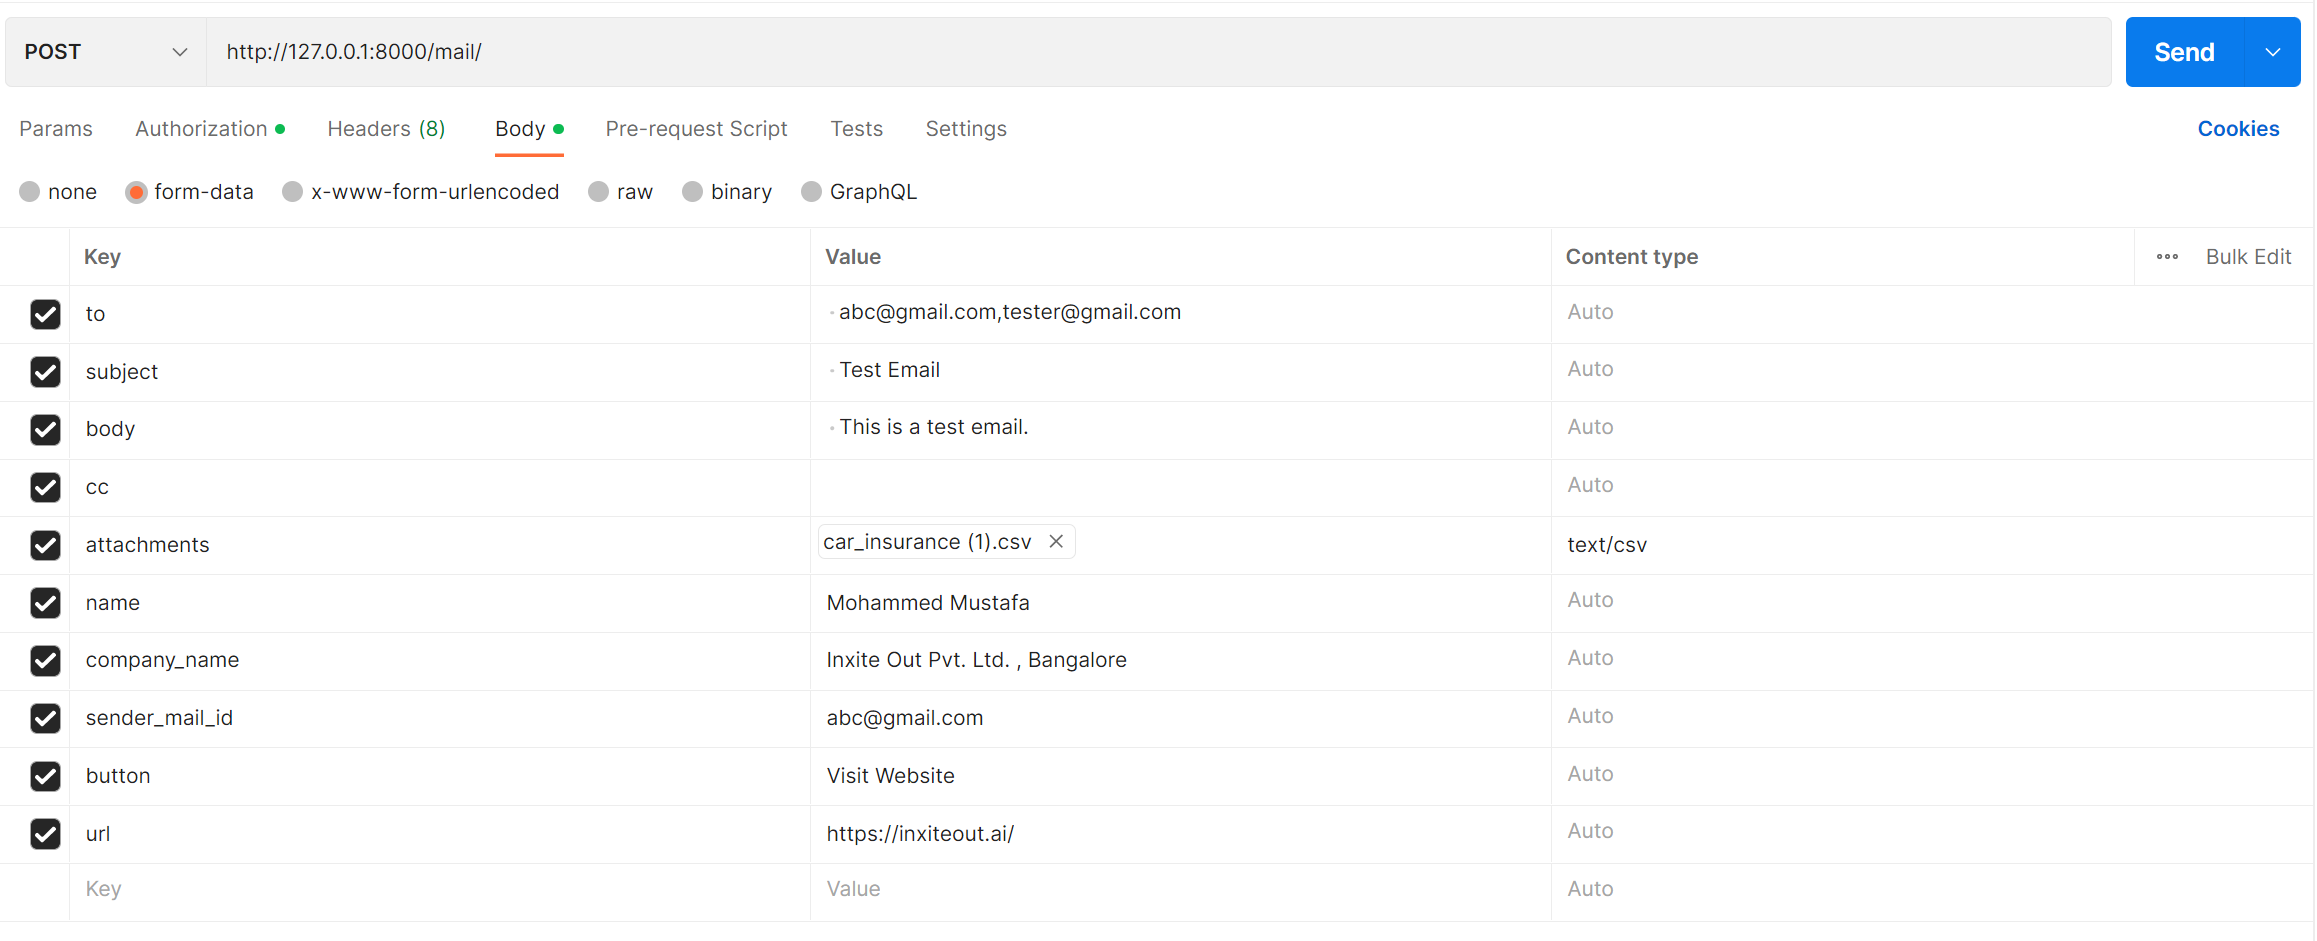
To send bulk emails, send a POST request to the mail/send_bulk endpoint with the following fields in the request body of form data (only for /mail and /mail/send_bulk):
to- a comma-separated list of email addresses to send the email to.cc(optional) - a comma-separated list of email addresses to carbon copy.subject- the subject of the email.body- the content of the email.name(optional) - the name of the recipient.company_name- the name of the recipient's company.sender_mail_id(optional) - the sender's email address.button(optional) - the text to display on the button in the email.url(optional) - the URL to link the button to.attachments(optional) - the files to be attached in the mail.
The email will then be sent to your Mailtrap.io inbox, where you can view and test it.
If you are having trouble receiving emails in Mailtrap.io, make sure your SMTP credentials are correct and that you have set up your Mailtrap.io inbox correctly. If you are still having issues, check the Mailtrap.io documentation or contact their support team.