Tutorial
- Copy/Paste UV
- Transfer UV
- Flip/Rotate UV
- Mirror UV
- Move UV
- World Scale UV
- Preserve UV Aspect
- Texture Lock
- Texture Wrap
- UV Sculpt
- Unwrap Constraint
- Texture Projection
- UVW
- Align UV
- Smooth UV
- Select UV
- Pack UV (Extension)
- Clip UV
- Align UV Cursor
- UV Cursor Location
- UV Bounding Box
- UV Inspection
Because of the abolish of Tool shelf, all panels of Magic UV are moved to the Sidebar in Blender 2.8. In Blender 2.7x, you can find all panels on the Tool shelf as usual.
Copy and paste UV coordinates among same/different object's faces in 3D View.
Copy/Paste UV sometimes fails to paste UV correctly because of the incorrect UV index. Instead, you can try Transfer UV which you can copy and paste based on the topology.
| Location | 3D View > Sidebar > Edit > Copy/Paste UV |
| Location (Built-in Menu) | 3D View > U > Copy/Paste UV |
| Mode | Edit |
[Usage]
- Click check box Copy/Paste UV to show Copy/Paste UV menu
- Select faces whose UV you want to copy
- Click Copy > (Target UV Map)
- Select faces whose UV you want to paste
- Click Paste > (Target UV Map)
- There are special Target UV Map
- [Default] : Copy/paste UV maps currently displayed
- [All] : Copy/Paste all UV maps
- [New] : Allocate new UV map and paste to it
- Selection Sequence property provides a way to specify the ordering of copied/pasted faces by face selection
- If Seams property is enabled, you can also copy/paste seams
- Strategy property provides a way to decide copy/paste UV repeatedly if a number of copied faces is differs from pasted faces
- You can flip or rotate UV by changing Flip Copied UV property or Rotate Copied UV property
Copy and paste UV coordinates among same/different object's faces in UV Editor. This feature is derived from below add-on.
[AddOn] UV_Tool
| Location | UV Editor > Sidebar > Magic UV > Copy/Paste UV |
| Location (Built-in Menu) | UV Editor > UVs > Copy/Paste UV |
[Usage]
- Select UVs you want to copy
- Click Copy
- Select UVs you want to paste
- Click Paste
NOTICE: You must select UVs which consist closed loop (i.e. face)
Copy and paste UV coordinates among same topology objects.
| Location | 3D View > Sidebar > Edit > Copy/Paste UV |
| Location (Built-in Menu) | 3D View > Object > Copy/Paste UV |
| Mode | Object |
[Usage]
- Select object whose UV you want to copy
- Click Copy > (Target UV Map)
- Select objects whose UV you want to paste
- Click Paste > (Target UV Map)
- There are special Target UV Map
- [Default] : Copy/paste UV maps currently displayed
- [All] : Copy/Paste all UV maps
- [New] : Allocate new UV map and paste to it
- If Seams property is enabled, you can also copy/paste seams
- You can paste UV to the multiple objects
Copy and paste UV coordinates based on the mesh's topology.
Transfer UV can solve the Copy/Paste UV issue raised when the meshes don't have same UV indices. However, Transfer UV also can not solve the issue raised when you try the meshes which don't have same topology.
| Location | 3D View > Sidebar > Edit > Copy/Paste UV |
| Location (Built-in Menu) | 3D View > U > Copy/Paste UV |
| Mode | Edit |
[Usage]
- Click check box Transfer UV to show Transfer UV menu
- Select 2 adjacent faces of the mesh whose UV you want to copy
- Click Copy
- Select 2 adjacent faces of the mesh whose UV you want to paste
- Click Paste
NOTICE: Copied/Pasted mesh must have the same number of faces
- Transfer UV ignore the hidden faces.
- You can paste UV to the multiple meshes
- If Seams property is enabled, you can also copy/paste seams
- If Invert Normals property is enabled, you can copy/paste to the mirrored mesh
Flip or rotate UV.
| Location | 3D View > Sidebar > Edit > UV Manipulation |
| Location (Built-in Menu) | 3D View > U > UV Manipulation |
| Mode | Edit |
[Usage]
- Click check box Flip/Rotate UV to show Flip/Rotate UV menu
- Select faces whose UV you want to flip or rotate.
- Click Flip/Rotate
- Change value Flip UV or Rotate UV
- If Seams property is enabled, you can also flip/rotate seams
Make mirrored UV. This feature is derived from below add-on.
Addon: Copy UVs from Mirror
| Location | 3D View > Sidebar > Edit > UV Manipulation |
| Location (Built-in Menu) | 3D View > U > UV Manipulation |
| Mode | Edit |
[Usage]
- Click check box Mirror UV to show Mirror UV menu
- Select faces you want to refer
- Choose the axis of the mirror direction
- Click Mirror
- Error property can change the error threshold for mirror
- Origin property specifies the origin of the mirror operation
| Location | 3D View > Sidebar > Edit > UV Manipulation |
| Location (Built-in Menu) | 3D View > U > UV Manipulation |
| Mode | Edit |
Move UV with a mouse in 3D View. This feature is derived from below add-on.
ADDON: Move the UV from the 3D view
[Usage]
- Click check box Move UV to show Move UV menu
- Select vertices/edges/faces whose UV you want to move
- Click Start
- Press Mouse Left Button to start moving UV
- You can move UV with mouse
- Press Mouse Left Button to stop moving UV
- If you want to cancel moving UV, press Mouse Right Button
Measure and set texel density. This feature is derived from below add-on.
[Addon] World Scale UV
| Location | 3D View > Sidebar > Edit > UV Manipulation |
| Location (Built-in Menu) | 3D View > U > UV Manipulation |
| Mode | Edit |
[Usage]
- Click check box World Scale UV to show World Scale UV menu
- Select mode Manual
- Change value Texture Size referred as virtual texture size
- Change value Density referred as target texel density
- Select face you want to apply texel density
- Click Apply
- Origin property changes the UV origin after applying texel density
-
Texture property is a texture to be used for the size calculation of density
- [Average]: Average size of textures assigned to the selected object
- [Max]: Max size of textures assigned to the selected object
- [Min]: Min size of textures assigned to the selected object
- (Texture Name): Size of selected texture
- Area Calculation Method property is a method to calculate mesh area, UV area and density
- If Only Selected property is on, apply only to the selected faces
[Usage]
- Click check box World Scale UV to show World Scale UV menu
- Select mode Same Density
- Select face you want to measure a texel density
- Click Measure
- You can see the target texel density
- Select face you want to apply texel density
- Click Apply
- Origin property changes the UV origin after applying texel density
-
Texture property is a texture to be used for the size calculation of density
- [Average]: Average size of textures assigned to the selected object
- [Max]: Max size of textures assigned to the selected object
- [Min]: Min size of textures assigned to the selected object
- (Texture Name): Size of selected texture
- Area Calculation Method property is a method to calculate mesh area, UV area and density
- If Only Selected property is on, measure/apply only to the selected faces
[Usage]
- Click check box World Scale UV to show World Scale UV menu
- Select mode Scaling Density
- Select face you want to measure a texel density
- Click Measure
- You can see the measured texel density
- Change value Scaling Factor for the scale factor of the texel density
- Select face you want to apply texel density
- Click Apply
- Origin property changes the UV origin after applying texel density
-
Texture property is a texture to be used for the size calculation of density
- [Average]: Average size of textures assigned to the selected object
- [Max]: Max size of textures assigned to the selected object
- [Min]: Min size of textures assigned to the selected object
- (Texture Name): Size of selected texture
- Area Calculation Method property is a method to calculate mesh area, UV area and density
- If Only Selected property is on, measure/apply only to the selected faces
[Usage]
- Click check box World Scale UV to show World Scale UV menu
- Select mode Proportional to Mesh
- Select face you want to measure a texel density
- Click Measure
- You can see the measured mesh area, UV area and density
- Select face you want to apply texel density
- Click Apply
- Origin property changes the UV origin after applying texel density
-
Texture property is a texture to be used for the size calculation of density
- [Average]: Average size of textures assigned to the selected object
- [Max]: Max size of textures assigned to the selected object
- [Min]: Min size of textures assigned to the selected object
- (Texture Name): Size of selected texture
- Area Calculation Method property is a method to calculate mesh area, UV area and density
- If Only Selected property is on, measure/apply only to the selected faces
Change assigned texture with preserving UV aspect.
| Location | 3D View > Sidebar > Edit > UV Manipulation |
| Location (Built-in Menu) | 3D View > U > UV Manipulation |
| Mode | Edit |
[Usage]
- Click check box Preserve UV Aspect to show Preserve UV Aspect menu
- Select face you want to change texture
- Select texture you want to assign
- Click Change Image
- Origin property changes the UV origin after changing texture
Preserve UV while you edit the mesh. This feature is same as "Preserve UVs" feature on 3dsmax.
| Location | 3D View > Sidebar > Edit > UV Manipulation |
| Location (Built-in Menu) | 3D View > U > UV Manipulation |
| Mode | Edit |
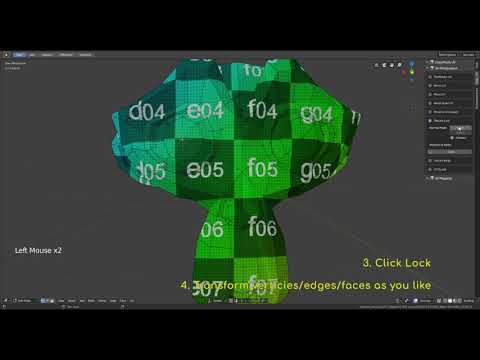
[Usage]
- Click check box Texture Lock to show Texture Lock menu
- Select vertices/edges/faces which you want to preserve UV
- Click Lock
- Transform vertices/edges/faces as you like
- Click Unlock, you can return to the UV before locking
- If Connect property is enabled, you can keep UV connection by changing other face's UV.
[Usage]
- Click check box Texture Lock to show Texture Lock menu
- Select vertices/edges/faces which you want to preserve UV
- Click Lock
- Transform vertices/edges/faces while preserving UV
- Click Unlock
Set texture coordinate along to the mesh structure.
| Location | 3D View > Sidebar > Edit > UV Manipulation |
| Location (Built-in Menu) | 3D View > U > UV Manipulation |
| Mode | Edit |
[Usage]
- Click check box Texture Wrap to show Texture Wrap menu
- Select a face whose UV you want to refer as initial position
- Click Refer
- Select an adjacent face whose UV you want to set
- Click Set
- If Set and Refer property is enabled, you don't need to click Refer after Set as long as you refer same face
- If Selection Sequence property is enabled, you can select multiple faces and apply Set at once. The application order follows the selection sequence
UV Sculpt in 3D View. Same features are supported as the UV sculpt in UV Editor.
| Location | 3D View > Sidebar > Edit > UV Manipulation |
| Location (Built-in Menu) | 3D View > U > UV Manipulation |
| Mode | Edit |
[Usage]
- Click check box UV Sculpt to show UV Sculpt menu
- Select faces whose UV you want to sculpt
- Click Enable
- Sculpt UV as you like (See detail each tool's usage)
- Click Disable
| Grab | Move UV along to the mouse movement while you press Mouse Left Button |
| Relax | Relax UV while you press Mouse Left Button |
| Pinch | Pinch UV while you press Mouse Left Button |
- If Show Brush property is enabled, display the brush's effective range while sculpting
- Radius property provides a way to change the brush radius
- Strength property provides a way to change the effectiveness
- You can change tool from Tools property
- Method property (only available on Relax tool) provides a way to change the relax method
- If Invert property (only available on Pinch tool) is enabled, the direction of pinch will be inverted
Unwrap UV with an axis fixed. This feature is same as "Unfold Constraints" feature on Maya.
| Location | 3D View > Sidebar > Edit > UV Mapping |
| Location (Built-in Menu) | 3D View > U > UV Mapping |
| Mode | Edit |
[Usage]
- Click check box Unwrap Constraint to show Unwrap Constraint menu
- Select faces whose UV you want to unwrap
- Enable or disable U-Constraint property and V-constraint property to fix axis while unwrapping
- Click Unwrap
- Default Unwrap property is also available
Project the texture to the mesh while displaying texture image in 3D View.
| Location | 3D View > Sidebar > Edit > UV Mapping |
| Location (Built-in Menu) | 3D View > U > UV Mapping |
| Mode | Edit |
[Usage]
- Click check box Texture Projection to show Texture Projection menu
- Select faces whose UV you want to apply Texture Projection
- Select a texture to be projected
- Click Enable to display the texture
- Adjust texture size and the mesh location to decide the location of projection
- Click Project to project texture to UV
- Click Disable
- Transparency property provides a way to change transparency of the displayed texture
- If Adjust Window property is enabled, size of the displayed texture is adjusted to the window
- Magnitude property (only available if Adjust Window is disabled) provides a way to change size of displayed texture
- If Texture Aspect Ratio property is enabled, keep the original aspect of the displayed texture
- If Assign UV Map property is enabled, assign new UV map when no UV is assigned to the mesh
- Scaling , Rotation , Translation properties provide a way to apply the affine transformation to the displayed texture
UVW mapping.
| Location | 3D View > Sidebar > Edit > UV Mapping |
| Location (Built-in Menu) | 3D View > U > UV Mapping |
| Mode | Edit |
[Usage]
- Click check box UVW to show UVW menu
- Select faces you want to apply UVW mapping
- Click Box if you apply Box mapping, or click Best Planner if you apply Best Planner mapping
- If Assign UV Map property is enabled, assign new UV map when no UV is assigned to the mesh
- You can tweak mapping configuration by the property
- Force Axis property specifies the axis to apply force mapping
| Location | UV Editor > Sidebar > Magic UV > UV Manipulation |
| Location (Built-in Menu) | UV Editor > UVs > UV Manipulation |
Align UV. This feature is derived from below add-on.
[AddOn] UV_Tool
[Usage]
- Click check box Align UV to show Align UV menu
- Select UVs you want to align (see details below)
- Click Circle or Straighten or XY-axis depending on your purpose
| Align method | Select | Align to |
|---|---|---|
| Circle | All the outermost UVs | Round shape |
| Straighten | The endmost UVs | Straight line between begin UV and end UV |
| XY-axis | The endmost UVs | Straight line along to X or Y axis |
- If Transmission property is enabled, align UVs with vertical direction
- If Select property is enabled, the aligned UVs will be selected after operation
- If Vertical property is enabled, align UVs to vertical direction with using the influence of mesh vertex location
- If Horizontal property is enabled, align UVs to horizontal direction with using influence of mesh vertex location
- Mesh Influence property provides a way to change the influence of mesh structure
- In case of XY-axis alignment, you can change the location (Middle, Right/Bottom, Left/Top) after UV alignment
Snap UV coordinates to the specified location.
Snap to Point
Snap UV coordinates to the location specified by Target Point.
[Usage]
- Click check box Align UV to show Align UV menu
- Select snap method Point.
- Set Target Point where UV coordinate will snap to.
- Set snap Group (See below for details).
- Select vertices or faces or UV islands which you want to snap.
| Group | Description |
|---|---|
| Vertex | All selected vertices will snap to Target Point |
| Face | Center of all selected faces will snap to Target Point |
| UV Island | Center of all selected islands will snap to Target Point |
Snap to Edge
Snap UV coordinates to the location specified by Target Edge.
[Usage]
- Click check box Align UV to show Align UV menu
- Select snap method Edge.
- Set Target Edge where UV edge will snap to.
- Set snap Group (See below for details).
- Select edges which you want to snap.
| Group | Description |
|---|---|
| Edge | Selected edge will snap to the center of Target Edge |
| Face | All edges belonging to faces which are included in selected edge will snap to the center of Target Edge |
| UV Island | All edges belonging to UV islands which are included in selected edge will snap to the center of Target Edge |
Smooth UV. This feature is derived from below add-on.
[AddOn] UV_Tool
| Location | UV Editor > Sidebar > Magic UV > UV Manipulation |
| Location (Built-in Menu) | UV Editor > UVs > UV Manipulation |
[Usage]
- Click check box Smooth UV to show Smooth UV menu
- Select UVs you want to smooth (The endmost UVs must be selected)
- Click Smooth
- If Transmission property is enabled, smooth UVs which are located on vertical direction of selected UV
- If Select property is enabled, the smoothed UVs are selected
- Mesh Influence property provides a way to change the influence of mesh structure
Select UV under the specific condition.
| Location | UV Editor > Sidebar > Magic UV > UV Manipulation |
| Location (Built-in Menu) | UV Editor > UVs > UV Manipulation |
[Usage]
- Click check box Select UV to show Select UV menu
- Click Overlapped or Flipped depending on your purpose (see details below)
| Feature | Select target |
|---|---|
| Overlapped | Select all overlapped UVs |
| Flipped | Select all flipped UVs |
- Zoom selected UV in View3D by clicking Zoom Selected UV
- Same Polygon Threshold property provides a way to set a threshold for judging the same polygons
- Selection Method property specify how to select the faces
- If Sync Mesh Selection is enabled, Select the mesh's faces as well as UV's faces
Apply island packing and integrate islands which have same shape.
| Location | UV Editor > Sidebar > Magic UV > UV Manipulation |
| Location (Built-in Menu) | UV Editor > UVs > UV Manipulation |
[Usage]
- Click check box Pack UV (Extension) to show Pack UV (Extension) menu
- Select faces whose UV you want to pack
- Click Pack UV
- Allowable Center Deviation property provides a way to specify the center deviation that regards as the same island
- Allowable Size Deviation property provides a way to specify the size deviation that regards as the same island
- Default Pack Islands property is available
Clip UV coordinate to the specified range.
| Location | UV Editor > Sidebar > Magic UV > UV Manipulation |
| Location (Built-in Menu) | UV Editor > UVs > UV Manipulation |
[Usage]
- Click check box Clip UV to show Clip UV menu
- Select faces you want to clip UV coordinates
- Click Clip UV
- Range property specifies the clipping range
Align UV cursor (2D Cursor in UV Editor).
| Location | UV Editor > Sidebar > Magic UV > Editor Enhancement |
| Location (Built-in Menu) | UV Editor > UVs > Editor Enhancement |
[Usage]
- Click check box Align UV Cursor to show Align UV Cursor menu
- Select Texture or UV or UV (Selected) depending on your purpose (See details below)
- Click the position button (You can choose the position from 9 buttons)
| Mode | Align to |
|---|---|
| Texture | Selected texture |
| UV | Displayed UV (includes non-selected UV) |
| UV (Selected) | Displayed UV (only selected UV) |
Set and display UV Cursor (2D Cursor in UV Editor) location.
| Location | UV Editor > Sidebar > Magic UV > Editor Enhancement |
[Usage]
- Click check box UV Cursor Location to show UV Cursor Location menu
- UV cursor location is displayed, and you can set the new location as you like
Transform UV with Bounding Box like a Photoshop/GIMP's Bounding Box.
| Location | UV Editor > Sidebar > Magic UV > Editor Enhancement |
| Location (Built-in Menu) | UV Editor > UVs > Editor Enhancement |
[Usage]
- Click check box UV Bounding Box to show UV Bounding Box menu
- Click Show to show the bounding box
- Transform UV with the bounding box as you like (You can transform UV same as Photoshop/Gimp)
- Click Hide
- If Uniform Scaling property is enabled, you can transform uniformly
- Boundary property specify the boundary of the bounding box
| Location | UV Editor > Sidebar > Magic UV > Editor Enhancement |
| Location (Built-in Menu) | UV Editor > UVs > Editor Enhancement |
Inspect UV and help you to find which UV is on the abnormal condition.
[Usage]
- Click check box UV Inspection to show UV Inspection menu
- Click Show to enhance the part on which is under specific condition
- Click Update if you want to update to the latest status
- Click Hide
- If Overlapped property is enabled, the overlapped part/face is enhanced
- If Flipped property is enabled, the flipped part/face is enhanced
- If you specify Part in Mode property, enhance only to the overlapped/flipped part. If you specify Face, enhance the overlapped/flipped face
- Same Polygon Threshold property provides a way to set a threshold for judging the same polygons
- If Display View3D is enabled, display overlapped/flipped faces on View3D as well as UV Editor
Paint UV island with random color.
[Usage]
- Click check box UV Inspection to show UV Inspection menu
- Click Paint UV island