This is a scene-based generative agent demo, based on the Vland platform and the paper Generative Agents: Interactive Simulacra of Human Behavior by Park, et. al.
Thanks to Harrison Chase for the agent_simulations demo based on his own Langchain. We then packaged and fine-tuned on this basis. Looking forward to more interested developers can develop more in-depth based on this demo. Such as simulated town, social science experimental research, etc.
You can watch Demo video.
demo.mp4
Welome to join our discord group.
First, you need to configure your own OPENAI_API_KEY. You can get it from OpenAI API Key. It is recommended that you use a paid account, otherwise you will receive frequency restrictions during use. For details, please refer to OpenAI rate limits
Set it in agent/config.py.
os.environ["OPENAI_API_KEY"] = "your own key"Next, you need to configure your own Vland config in main.py.
You can get apiId, apiKey, eventId, spaceId in Vland platform.
- The
apiIdis your user id. It is displayed in the account in the upper right corner of the page.
- The
apiKeyis for each different vland events. You can create and copy it in Manage events
- The
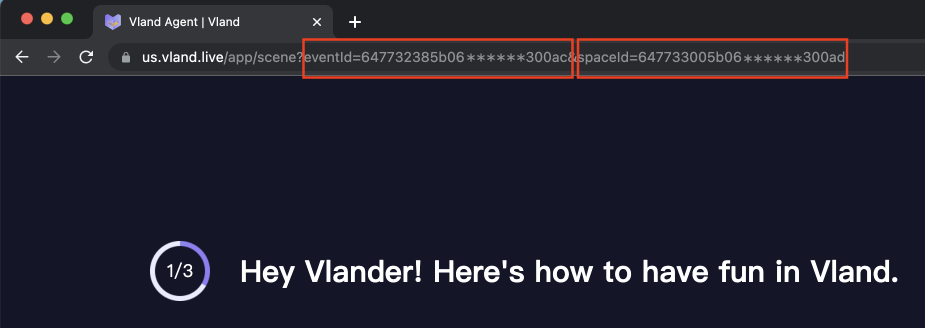
eventIdandspaceIdis for each different space in the event. You can find them in the link after entering the space.
wsconfig = {
    "apiId": "your vland id",
    "apiKey": "event api key",
    "eventId": "event id",
    "spaceId": "space id",
    "listener": get_server_response
}
We preset the data of 4 agents for you. You can modify the data in vland/data.py according to your needs.
The avatar in the data represents the number of the Vland avatar. You can fill in according to your preferences.
agentData = {
    "vlandagent1": {
        "name": "Tommie",
        "personality": "anxious, likes design, talkative",
        "age": 25,
        "memories": [
            "Tommie remembers his dog, Bruno, from when he was a kid",
            "Tommie feels tired from driving so far",
            "Tommie sees the new home",
            "The new neighbors have a cat",
            "The road is noisy at night",
            "Tommie is hungry",
            "Tommie tries to get some rest."
        ],
        "current_status": "looking for a job",
        "avatar": 1
    },
    ...
}
Then you need enter the Vland space, so that you can observe later.
Finally, run your main.py
python main.py
# maybe your command to run python is differentIf you see the following in the console, it means that you have connected to the server and successfully generated the agent.
And these agents will appear in your vland space.
You need to check the network and your Vland config, if it doesn't happen according to plan.
Then these agents will run according to your logic and ChatGPT
The destination of the agent's movement is selected from the marked area in the space.
You can follow the steps below to create a space and edit the area.
-
Sign up and log in to Vland.
-
We provide many exquisite templates for you to quickly create your space. You can also create an empty map and use the materials we provide to decorate your space
-
Select the Special interaction in the Effect. Frame the area you want to mark on the map and enter a unique name.
-
Finally, remember to save the map, then you can enter your own space.
Use the interface provided by vland and the method of generating agents.
You can define the logic that your agent runs in main.py like
'''
Call the interface provided by vland to get all the agents in the current area.
Record the acquired data into agent's observations.
And respond to the observation.
Then tell other agents about this action.
'''
async def _observe_an_area(self):
    # call vland.get_all_in_area(area="living room") to get agents info in the current area
    self.currentArea = await self.vland.get_all_in_area(area="living room")

    # create an observation
    observation = "In the " + self.currentArea["name"] +  ", you met "
    hasOthers = False
    for pid in self.currentArea["data"]:
        if pid != self.playerInfo["pid"] and pid in agentData:
            observation += agentData[pid]["name"] + ", "
            hasOthers = True
    if hasOthers:
        # save this observation to memory
        self.memory.add_memory(observation)
        # generate reaction by observation
        _, reaction, area = self.player.generate_reaction(observation, self.areaList["names"])
        print(colored(observation, "green"), colored(area, "blue"), reaction)
        # call vland.operate_robot to command the agent to act
        self.vland.operate_robot(self.playerInfo["pid"], area=area, message=reaction)

        notice = {}
        notice["pid"] = self.playerInfo["pid"]
        notice["action"] = reaction
        # push to other agents
        self.eventbus.publish("action", notice)
The Vland interface related to generating agents is written in vland/vlandapi
We will continue to add more interfaces.
And the functions that can be realized can also refer to Vland websocket sdk (node.js)
For support, you can join our discord group . Or email vland.live@gmail.com


